|
|
|
|||||||||||||||||||||||||||||||||||||||||||||||||||||||||||||||||||||||||||||||||||||
|
|
||||||||||||||||||||||||||||||||||||||||||||||||||||||||||||||
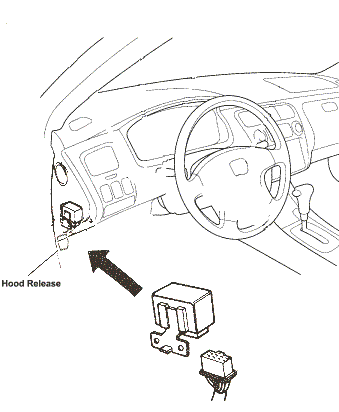
Civic Main Relay Locations
96, 97, 98 and 99 - 00 Civic Main Relay Removal Procedure
The relay is located to the right of the glove box along the wall of the right kick panel.

Steps
- Remove the glove box by removing the bottom panel under the glove box (several screws.)
- Look upward and remove the screws holding the glove box's hinges.
- Lower the glove box, if not possible then squeeze any tabs necessary (do not bend till it breaks.)
- With a 10 mm socket or wrench, reach deep inside and at the top of the relay there you will feel a bolt.
- Unbolt it. (If you cannot unbolt then you may dislodge the relay from the relay case.)
- Bring the relay down and unplug the connector by squeezing the lock flap then separate the connector from the relay.
- Installation is the reverse of the procedure.
What does a main relay do? see FLASH demo. 85-91
Resolder 92-95
Relay ![]()
85, 86, 87, 88, 89, 90 and 91 Civic Main Relay Removal Procedure
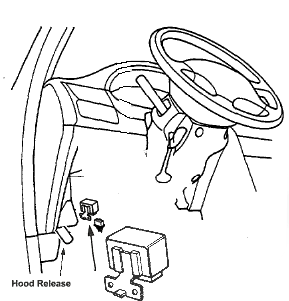
The 85-91 Civics is located right above the fuse box. It can be felt while leaning down from driver's seat. The color of the relay is usually black with a brown base. The wires coming from it are usually seven. It can even be seen without access panels removed. It's to the right and above the hood latch release. It's pretty high up. Removing it may require removing several parts surrounding it.
 |
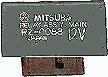
A main relay should
look like this
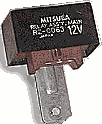
|
| or this.
|
- Remove the coin box (for a better view)
- With a 10 mm socket or wrench, reach deep inside and at the top of the relay there you will feel a bolt.
- Unbolt it. (If you cannot unbolt then you may alternatively:
remove the internal relay assembly. See drawing D below. Press your thumb against a the right relay case wall then pull the right internal parts out then press again on the left relay case wall then pull the rest out. The main relay is live so you should disconnect the car battery since you may accidentally short the relay or other nearby parts. The symptom of a short is when your car won't start after you replace the main relay.
- Otherwise, bring the relay down and unplug the connector by squeezing the lock flap then separate the connector from the relay.
92, 93, 94 and 95 Civic Main Relay Removal Procedure
 |
A main relay should
look like this
|
| or this.
|
The main relay is to the left of the fuse box, wedged up against the left above the hood latch in a tight spot.
- Remove the coin box (for a better view.)
- With a 10 mm socket or wrench., reach deep inside and at the top of the relay there you will feel a bolt.
- Unbolt it. (If you cannot unbolt then you may alternatively:
remove the internal relay assembly. See drawing D below. Press your thumb against a the right relay case wall then pull the right internal parts out then press again on the left relay case wall then pull the rest out. The main relay is live so you should disconnect the car battery since you may accidentally short the relay or other nearby parts. The symptom of a short is when your car won't start after you replace the main relay.
- Otherwise, bring the relay down and unplug the connector by squeezing the lock flap then separate the connector from the relay.
- If you damage the tab, you may be able to flatten the tab back to shape.
- See installation at the bottom of this page.
How do I get the main relay out?
Steps: See four ways below to remove the main relay. You may have to reach high up and under the dashboard to complete the job with one hand and a flashlight.
|

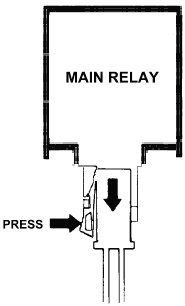
A. Unbolt the bolt using a 10mm socket (picture A) or
Ab. Unclip the clip from the steel tab and slide it apart (picture A) or
B. Separate the steel tab from the plastic case (picture B) with a
large flat screw driver
jam and twist between the plastic case and the tab or
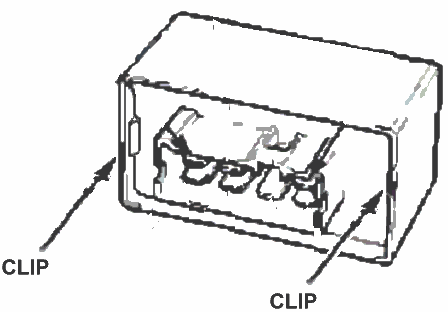
C. Disconnect the negative battery terminal. Unclip two clips I pointed with two arrows (picture C, or below)
with a small flat head screw driver or with a strong thumb and then yank it out (D.)
This is the preferred choice by many. Mechanics prefer choice A and maybe
B. See
detailed relay photo.
|
| REPAIR/FIX>> |
Read comments.
[ Comments ]
Url to for printing - non css: