|
|
||||||||||||||||||||||||||||||||||||||||||||||||||||||||||
Troubleshooting the Honda Ignition System - Coil, Igniter and more
CAUTION: |
Always ground the high-voltage secondary port on the coil when doing electrical tests and cranking. The igniter or coil may destroy itself when the high voltage attempts to find another short path to ground. Shorting the high voltage port out won't harm the coil. |
CAUTION: |
Always switch off the ignition or disconnect the negative battery cable before doing repair work on the electronic ignition system. Remove power to the ignition system or use a starter bypass switch when checking cylinder compression. See safety tips for details. |
ALERT UPDATE: 90-93 Accord owner may expect sudden failure of the igniter, coil, main relay, and/or possibly the distributor rotor, all due to their age. The igniter and distributor rotor are the most common failure and are dangerous because they may stall in traffic and won't restart. It's highly recommended that you replace your igniter, coil, main relay, and the distributor rotor. Especially, if your ignitor brand is "OKI."
-(9/01/14)
How to spot a bad
ignition circuit -
In 10 minutes
Overview: You ride along in your Acura or Honda when
suddenly your car cuts out. As you lose momentum
your car rolls a few feet to a stop and won't restart even though the engine cranks. Friends and
strangers help push your car along. You've just
experience what is most likely an ignition
fault. To properly solve this problem, start with the basic
checks first. Avoid skipping section 1 or 3 as you progress to section 4.
- Start here... (Basic check flow chart)
- Section 1... (How to check for spark)
- Section 2... (Symptoms: Visual troubleshooting)
- Section 3... (Input troubleshooting)
- Section 4... (How to test the coil and igniter)


The battery current takes its path from the ignition switch then splits into several components then ends up at the spark plugs. To produce a spark, the distributor sends tiny electrical pulses to the igniter (and on later models, to the ECU and back to the distributor again). If any one of these paths are broken there will be no spark and the car will stall. This page will guide you thru a step by step tutorial that will help you eliminate each possible problem in order to find the solution. Many of the steps are not found in the service manual.
 |
|
|
Ignition switch,
Basic starting guide |
|
| Timing Belt Ignition Switch ECU, Main Relay, Fuse(s) [fuse image] or a bad ground. Main Relay Fuel Pump |
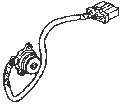
Here are the general areas where you may be able to find the coil or the igniter.
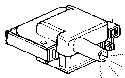
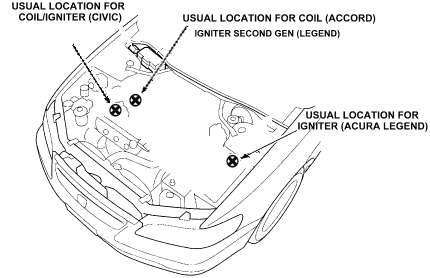 What does a coil look like?
Civic and Accord igniter is inside the distributor. Civic's coil is inside the distributor. Accord's
coil is bolted on the intake or the passenger side shock tower.
-
The first step is to realize that Honda have recalled several types of ignition switches where too much current have either melted the solder or pitted the sliding contacts inside the switches, stalling the car in traffic. Some switches even develop crud from the factory grease creating an open circuit, stalling the car in traffic. Most often, the vehicle can be restarted. Take note whether the instrument warning lights immediately went out when the vehicle stalled. Almost every Honda has to light up the instrument once stalled. A completely dead ignition switch will produce no spark. See ignition switch symptoms for details.
-
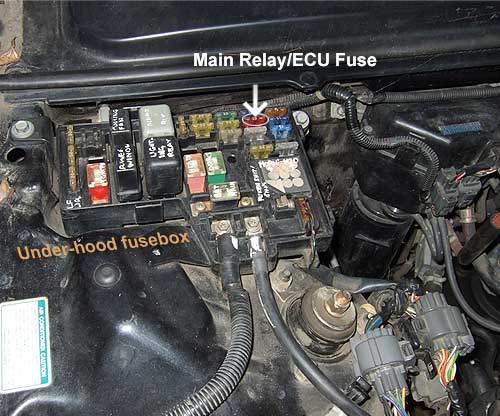
The second step is to check all the important fuses such as the ignition, ECU, main relay and fuel pump fuses.
-
Check the "check engine light." It should go on then off, if it stays on or stays off then the there won't be any spark on most models. See ecu.html
-
Check the main relay basic functions under the main relay FAQ. A dead main relay will produce no spark on most models.
-
Check and make sure the instrument gauge circuit check lights (the red and orange lights) on the instrument gauge work normally. If not then the car won't start and is not related to the coil or the igniter, unless the check engine light is on.
If the light is on look for codes codes (for example) 4, 8, 9, 15, 54 and/or 58. These codes will often indicate a bad part or a bad wire inside the distributor. Or even an open between the ECU and the distributor. Other codes not listed here can show up and may cause a no-start. Codes that cause a no-start are, for example, are the Intake air temperature sensor, or the TW sensor.
-
The next step is to check for spark.
Section 1 - How to check for spark.
-
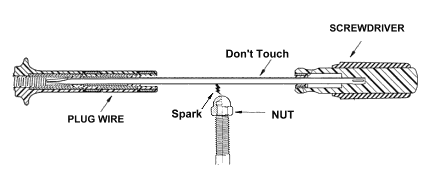
Remove one end of the plug wire.
-
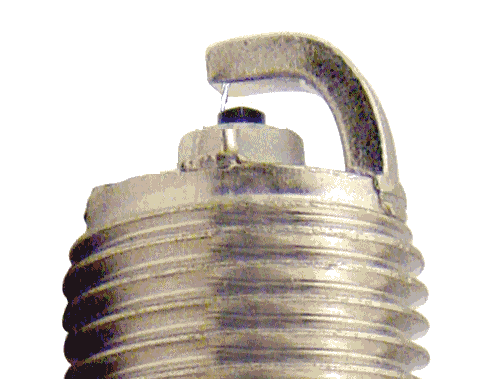
Insert a spark plug into the wire. (A screw driver in the place of the plug is accurate because the wider spark gap forces the ignition coil to output its maximum voltage and will often locate a weak ignition coil. The larger gap will also force the sparks toward your hand.)
-
Lay the plug's solid end on top of a suitable ground (E.g. exposed bolt, nut, etc.) viewable from the driver seat (if working alone.) Or hold the screw driver near a grounded bolt.
-
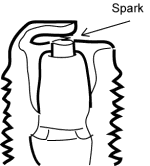
Crank the engine (for three to five revolutions) then read the blue decision box below.
|
Coil output tester [ Image]
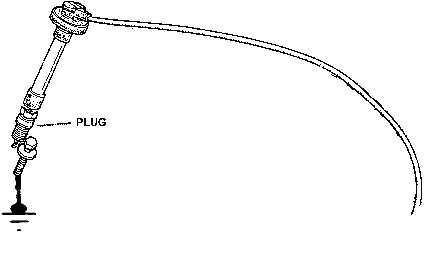
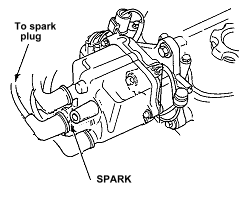
Checking for spark between distributor cap and plug wire. (safe, simple method)
Steps :
- Unplug the spark plug wire (the same wire connected to the engine and spark plug) from the distributor cap end.
- Hold the end of the wire very close to the distributor cap terminal. (Using an insulated pair of pliers to hold the plug wire is optional, but recommended.)
- Crank the engine then read the blue decision box below.
Note: If there are no spark make sure to use a solid ground wire, not the spark plug wire as shown. If there are spark by using a ground wire then the spark plug or spark plug wire is bad.
Hint: By using a ground wire with a substantial gap, the wider spark gap forces the ignition coil to output its maximum voltage and will often locate a weak ignition coil.
Quick lesson: Although this method seems risky, it's safer than using the screwdriver since your fingers are less likely to receive the shock. The reasoning behind this can be explain in History. When Benjamin Franklin began installing lightning rods on the tops of the houses in which the path of the lightening is carried away from the house, many homes were saved by Franklin's experiment. His experiment proves that lightning could be directed away from its target. Similar to this case, the spark is attracted to the plug wire which is directed away from your fingers. But keep your fingers far from the metal stud protuding from the coil wire.
Blue Decision Box:
There should be a visible blue-white spark. If no spark is evident, or if the spark is weak (yellow spark color), inspect the spark plug wire, the ignition coil, or the distributor itself for damage or melted parts.
If there are no sparks then continue to check for spark at the coil. If you do find a visible blue-white spark then the problem isn't ignition related. Go back to the home page and start over. You may have a flooded engine, lean engine misfire or some other issues. Otherwise continue below.
If you have spark and fuel but won't start.
-
If you have spark and fuel but won't start then the timing could be off. The distributor rotor could melt and cuase the timing to go off. Check the rotor and make sure it hasn't warped.
-
If you have spark and fuel but won't start then make sure the fuel smells like fuel and not diesel, water or gas that's been sitting in the tank for a long time. Use a starting fluid as a test.
-
If you have spark and fuel but won't start then the spark may be too weak to make the spark inside the pressurized cylinder. To confirm this, attach a timing gun on the spark plug wires. If the the timing gun doesn't light while cranking then the coil is too weak. A weak coil can also be confirm with a coil output tester [ Image]
-
If you have spark and hear the clicks from the injectors check that the spark plug boot isn't soak in water or oil.
-
If you have spark and smell gas but won't start. Confirm the ignition timing.
Steps
-
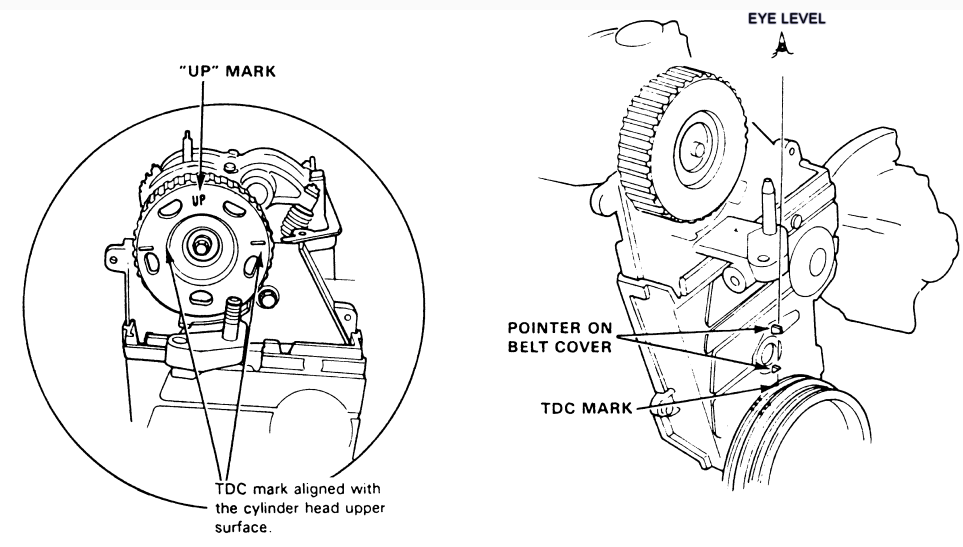
Turn the crankshaft until the timing marks on the pulley or the flywheel points to a white dot next to a letter "T." Make sure the word "UP" is right side up on the camshaft gear and exactly perpendicular the horizontal plane of the head. [ drawing]
-
Line the distributor rotor so that rotor points to the number 1 cylinder. See bottom of page for more about fixing timing.
(Tip: How to confirm fuel pressure see fuel supply FAQ "check fuel pressure without a gauge." Or use a fuel pressure gauge. A pressure of 40-45 psi is adequate.)
-
-
If you have spark and smell gas but won't start. Confirm with a coil output strength tester [Image] or check the coil's resistance, which is different for each differrent type of coil. Checking the coil's resistance isn't recommended other than checking to make sure the coil hasn't shorted internally - which may harm your igniter.
-
If you have spark and smell gas but won't start from a fuel flooding then waiting overnight would clear it up. Otherwise, you may try many of the various de-flooding techniques. One example of the technique is to press the gas to the floor and hold it there and only release it when the car runs, while keeping the rpm above a thousand. Others include manually drying out the plugs.
-
If you have spark and smell gas but won't start check for a dead, weak or a broken plug(s) or plug wires. (It takes one bad plug to flood the engine.)
-
If you have spark and smell gas but won't start check for a bad cylinder compression. If it won't start because of a recent overheating, then your compression may be too low. A single cylinder with a bad compression may cause the engine to flood during starting. Compression can be checked by a compression tester or manually turn the crankshaft with a wrench by hand (which usually works best once you are familiar with the cylinder strokes.) The compression should read at least higher than about 150 psi.
-
If you have spark and fuel but won't start check for a bad cold start sensor.
-
There may be other causes that are not listed here.
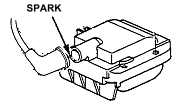
Checking for spark from the coil. (An important step if you don't have spark.)
Steps:
-
Open the distributor cap, if your coil is inside the distributor.
-
Run a ground lead (one end connected securely to negative body ground.) Now leave a small gap (1/4 to 3/4 inch size gap) between the ground wire and the coil's output port. Caution: Avoid touching the wire with your hand if the wire is not a spark plug wire.
-
Crank the engine and watch for the sparks.
-
Warning: Do not crank the motor without this ground wire close enough to make the spark or permanent coil damage, possible igniter damage or weakening of the igniter may result.
-
Notice: Do not crank for too long to prevent damaging your starter or flooding the engine which may reduce your oxygen sensor's life. To unflood your engine pull the fuel pump and/or injector or ECU fuses then crank the engine for 8-15 seconds.
 Apply
a ground wire
very close to the secondary port. Safety:
Keep your fingers far from the spark area. Preferably, use a pair of pliers with a rubber handle rated for high voltages. Refer to the 'safety tips' box for more information.
Apply
a ground wire
very close to the secondary port. Safety:
Keep your fingers far from the spark area. Preferably, use a pair of pliers with a rubber handle rated for high voltages. Refer to the 'safety tips' box for more information.
If there is spark then replace the cap, the high tension wires and/or the rotor. If there is moisture inside the cap then see humid.html for details. Otherwise continue below.
I really don't have the spark, what should I do?
-
Main relay. Confirm that the main relay is working. A bad main relay won't have spark on many Honda Acura models. Listen to the low whine of the fuel pump in the rear seats or the gas filler nozzle and take notice of the unusual activity of the Check Engine Light (CEL). The CEL light should come (followed by the whine) and then turn off. If the CEL light comes on and stays on with the key switched ON then this is the result of no power to the ECU or some other fault. This may be a sign of a bad main relay. Restore the main relay temporary by giving it CPR (Conk it, Poke it, Rattle it.)
-
Battery. Make sure that the battery cables are cleaned and tight. A battery with a dirty connection or a battery with a few dead cells will crank but won't start since the voltage can be too low. The same could happen with a bad ignition switch. Make sure to check the voltage at the ignition coil and ground. Then the battery terminal and ground. They should not be under 8 or 9V during cranking. At these voltages certain components will fail to operate. Although some ECU's can operate as low as 7.8V, most cannot. On older EFI models the symptoms are spark but not fuel. With a low voltage the fuel pump will also not run.
-
Ground. Make sure that the ground wire that you've used for the spark check is good.
-
Timing belt. Confirm that the timing belt is good by opening the oil cap to see if the rocker arms are moving. This should've been done earlier. If the rocker arms are not moving, you will need to deal with the timing belt first.
-
Ignition switch or fuses. Could it be the ignition switch or a blown fuse? Normally you should have no less than 9V while cranking at the coil's positive (+) terminal if your ignition switch, fuse or other connections are working properly. Normally, if you pass the troubleshooting flowchart above, chances are that the the fuses are good.
-
ECU. Confirm that the computer is working. Check for 5-Volt reference volts at various sensor such as at the throttle position sensor. If the "check engine" light comes on for 2 seconds and turns off then chances are that the computers is working OK. If it stays on then it's likely that part of the ECU has no power (most often a lack of proper grounding) or a critical device isn't speaking to the ECU. (A dead main main relay can allow the "check engine" light to stay on.)
ECU code 15: Code 15 is listed as an error in the "Ignition Output Signal." If you have this code it means that the ECU has found the Ignition module (igniter) signal is not received by the ECU which means that the igniter is dead, has a loose connection or has failed intermittently. The ECU looks for the 10V reference signal from the igniter. If the car won't start because of this code then check for a loose connection or go to section 4 on this page and be ready to replace the igniter.
Check for the ECU, CYL pickup coils, or TDC pickup coils functionality this way below (preferably with a test light, DMMs are not as accurate.) There should be a blinking light while cranking. Or bring your ear very close to the injectors, there should be clicks while cranking.
-
Next step. Continue below to section 2 or skip and go to section 3 (input troubleshooting.)
Section 2 - Symptoms: Visual Troubleshooting
What are the signs of a bad igniter?

 <------- NEC is a good known brand. If you don't have an NEC
or HITACHI then that could be the problem.
<------- NEC is a good known brand. If you don't have an NEC
or HITACHI then that could be the problem.
-
The tachometer quits abruptly or jerks around before stalling.
-
Once the car warms up and the igniter gets hot then the car dies. Occasionally it'll start back up or when the car has to sit and cool then it'll repeat the same symptoms.
-
For manual transmission, no spark, but when push start down hill, rpm won't shoot up.
-
Engine cranks but RPM needle on the gauge won't show a hint of life. (Remember, you won't be able to see the differences. The movements are very hard to point out. This is reserved for the keen observer and those with an extra strong car battery.)
-
No spark at the coil or No on/off voltage at the coil's (+, - ) terminals when cranking but find injectors pulsing or clicking. See section 4 of this page.
OKI brand was used.
Where can I buy a decent, low cost igniter?
Look online for "HONDA ACURA IGNITION CONTROL MODULE ICM LX615." Keyword
LX615. They can be had for  as low as $11 shipped. I believe they are
designed to withstand the back EMF that has plagued the OKI brand for a
while. Electronics have advance to a point where the prices are low and
the parts being much more reliable. I believe they could last up to
7-10 years or more. I use them and haven't had any problems. Make
sure to buy the one that says "JAPAN" on them (if you can find them.) I
bought two just in case. Genuine dealer NEC brand cost an average
of $90.
What are the signs of a bad ignition switch?
 How to replace the
ignition switch
How to replace the
ignition switch ![]()
-
The dash will go dark when it dies (no warning lights, no shift indicator, no electrical).
-
All of the gauges go dark when in the ON position but if held between the on and start position they light up.
-
Car stalls (clicks are heard) then restarts (clicks are heard), then stalls after driving.
-
Car runs fine when key slightly held at start position.
-
No battery voltage at the coil + positive terminal with the key turn to ON.
- See ignition switch symptoms for details.
What are the signs of a bad rotor?

The distributor rotor spins inside the distributor delivering spark to each plug wire in a timely manner. Some even contain a radio noise suppressor. Should it fail there will be no spark at the plugs, however, you will see spark at the coil. Check for spark.
-
The distributor is hot to the touch and the rotor bent.
-
No spark at the plug wires.
-
Spark is found at the coil.
-
A cricket noise is heard from the distributor before stalling.
What are the signs of a bad coil?
- It feels like the car just ran out of gas....Slowly bogging down to an eventual shut down or just simply shuts down
- The distributor had been disturbed before it died.
- No sparks.
- The distributor is hot to the touch or the coil have melted or have melted other nearby parts.
- For manual transmission, no spark, but when push start down hill, rpm will shoot up but won't start.
- Most often, the car won't fire and usually won't start from then on or will start when cooled down.
- Engine cranks with no hints of combustion.
- Engine cranks but RPM needle on the gauge is slightly moving, but no spark. (Remember, you won't be able to see the differences. The movements are very hard to point out. This is reserved for the keen observer and those with an extra strong car battery.)
- There is an On/Off power pulses at the input of the coil but no spark when cranking.
- You can't check for a dead coil with a multi-meter with its resistance scale. This is because a cracked coil could mislead you. However, it's still useful for locating a weak or finding other strange readings from the coil.
What are the signs of a bad ECU or no power to the ECU?
 How to troubleshoot no ECU power
 ![]()
-
No "check engine light."
-
"Check engine" lights comes on longer than usual or stays on.
-
No reference voltage. (5V at the Throttle Position Sensor, MAP sensor, or EGR valve lift sensor.)
-
No input battery voltage found at two or more ECU input sources, this include ground.
-
Cannot retrieve codes.
-
No injector clicks.
-
No spark on cars with electronic timing advance.
What are the signs of a bad fuel pump?
-
Fuel pump cuts out while driving, or while starting or idling, but the fuel pump may come back on while coasting or parking. The ignition warning lights will show up when the engine stops.
-
No sound is heard from the fuel tank or for the first two seconds after the ignition is on.
-
May happen at a particular rpm or speed.
-
Troubleshoot is possible by supplying battery and ground to the terminal of the fuel pump under the rear seats or under the trunk carpet.
What are the signs of a bad TPS?
-
Fuel pump cuts out while driving, fuel injectors cuts out while driving, starting or idling or won't start and check engine light is on. The check engine light won't come on if the failure is intermittent.
-
Usually happens at a particular throttle position.
What are the signs of a bad crank sensor?
-
Fuel pump cuts out while driving, starting or idling and a click is heard from the main relay.
-
Usually happens at a particular rpm or when ever the distributor shaft begins thrash itself around.
What are the signs of a bad Idle Air Control Valve (EACV)?
-
Car stalls in traffic only when idling under 1k rpm or the gear is in neutral.
-
A properly flowing EACV should idle the engine when the electrical connector is unplugged and the throttle butterfly valve is adjusted correctly.
Next step. Continue below.
Section 3 - Input Troubleshooting
TIP: For most people, you may want to first consider swapping it out with a cheap igniter/ignitor. See FAQ "Where can I buy a decent, low cost igniter?..." For the technically incline, please continue reading.
TOOL REQUIRED FOR THIS TEST: A test light

![]()
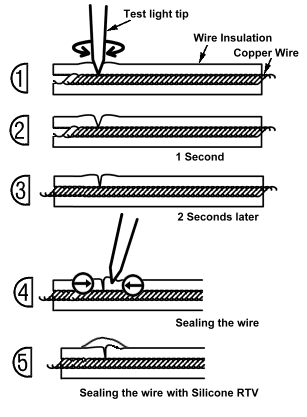 How to
use a test light: The test light tip must be kept clean,
smooth and sharp. The wire to be tested should also be clean. The tip twists and pierces into the wire and touches the copper
strand but not through. But when lifted from the wire, the
copper wire should disappear. The crater is reduced in size
using the tip of the test light. If you have difficulty, you may need to sharpen
your skill and sharpen your test light tip correctly.
Silicone RTV is recommended to help seal the wire from the
environment.
How to
use a test light: The test light tip must be kept clean,
smooth and sharp. The wire to be tested should also be clean. The tip twists and pierces into the wire and touches the copper
strand but not through. But when lifted from the wire, the
copper wire should disappear. The crater is reduced in size
using the tip of the test light. If you have difficulty, you may need to sharpen
your skill and sharpen your test light tip correctly.
Silicone RTV is recommended to help seal the wire from the
environment.
When done, store the test light from damage and dirt. Think of dirt as an infecting agent. A clean tip not only helps seal the wire but will also prevent skin infection if you happen to stab yourself.
DO NOT use a test light on the airbag system wires. Airbag wires, commonly painted yellow and wrapped in all yellow tubing, can energize and trigger the air bag if poked with a live test light. An air bag deployment can cause death, serious injuries, and property damage. Probing logic circuits can also cause computer damage. Use the test light only where instructed.
Note Honda does not recommend piercing the wire without properly cleaning and sealing the wire. In fact it is not recommended due to a possiblity of oxidation.
Airbag side note: Honda airbag commonly use two fast acting transistors to ignite the airbag. One to close ground the other to close positive. Three sensors throughout the car must activate before the airbag can deploy. The design may have changed, so please check your source.
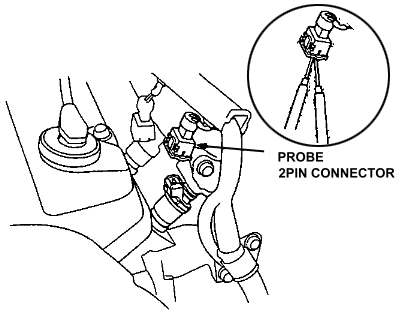
Approved method: Whenever possible probe the crimp of the connector pin.
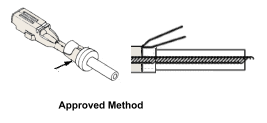
Input Troubleshooting
What is an igniter input test?
An input test measures the battery power at the igniter and coil terminals. Thus, the word input means is what is going to the components. A passed input test doesn't necessarily mean that the igniter is dead (Do not trust the service manual regarding their input test.) Do not replace the igniter, unless it's an OKI brand. Many people have used the original igniter for over 250K miles, requiring that you replace your ignition wires (with correct resistance,) spark plugs (correct gap and temperature,) the cap (requires routine scraping) and the rotor often.
Ignition circuit overview: Honda makes four types of ignition system. Covered below are the second and third generation system only. At the top of the diagram (figure 14) is the battery positive power source. At the bottom of the diagram is the battery ground. In this drawing, the current will flow from the top to the bottom. The coil's positive side and the ground side is energized when the ignition is on after the vehicle stalls in regards to the third generation system. But by switching the ignition from off to on, the coil power will be on for a fraction of second then remains off.
Steps:
-
Remove the distributor cap, rotor and dust cover. (Also check for melted parts.)
-
Make sure Blk/Yel on the coil input
 and distributor body ground has battery power with the key switch ON (using a test
light or DMM is fine. Don't disconnect the harness.)
and distributor body ground has battery power with the key switch ON (using a test
light or DMM is fine. Don't disconnect the harness.)
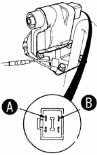 For the Civic coil see this [image].
For the Accord, this [image].
For the Civic coil see this [image].
For the Accord, this [image]. -
Make sure Blk/Yel on the igniter input
 and distributor body ground has battery power with the key switch ON.
-
If voltage is present, disconnect the WHT/BLU wire from terminal
 on the igniter.
Then check for battery voltage between the WHT/BLU wire and distributor body ground. Voltage should be present. If voltage is not present, check for an open in the WHT/BLU wire between the ignition coil and the igniter or a disconnected terminal. -
If voltage is not present, go back to step 2 and check for battery power against battery ground.
-
Turn the ignition switch off.
If the test check bad then there is a problem with the input. Don't proceed further until this problem is solved. To solve this problem simply make sure:
-
The ignition switch is OK.
-
The fuses are OK.
-
The fuse-box fuse terminals holding the fuses are okay. (Fuses are not checked by sight alone. Always use a test light or a multimeter.)
-
The connectors and harness are OK.
If all tests check good and the system still fails to function, continue with "Coil and Igniter Troubleshooting," on section 4 below.
 |
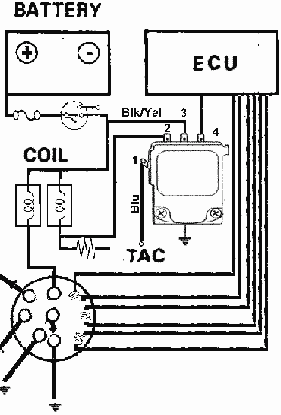
Figure 14. 90 Accord and above, 88 Civic and above and some Acura but not for the DIS*.
Electronic timing. The updated ignition system has a built in condensor.
|
Steps for the first generation electronic ignition.
-
Make sure there is battery power between Blk/Yel and distributor body ground with the key switch ON (using a test light is fine.)
-
If voltage is present, check for continuity between the igniter body and distributor housing then check for continuity between the distributor housing and battery negative terminal. There should be continuity.
|
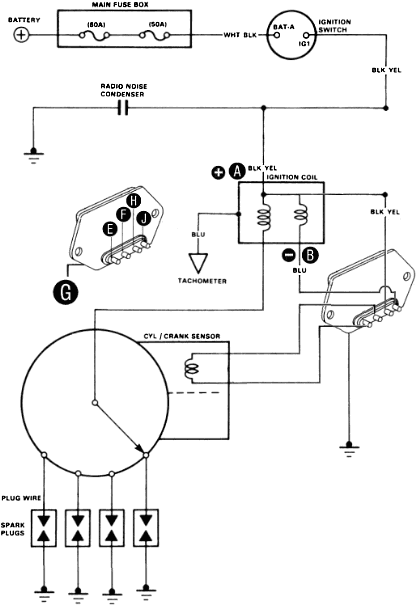
Figure 15. Second Generation 85-87 Civic, 86-89 Accord, Blu1=thick lead (from
igniter) |
If the test check bad then there is a problem with the input. Don't proceed further until this problem is solved. To solve this problem simply make sure:
-
The ignition switch is OK.
-
The fuses are OK.
-
The fuse-box fuse terminals holding the fuses are okay. (Fuses are not checked by sight alone. Always use a test light or a multimeter.)
-
The connectors and harness are OK.
If all tests check good and the system still fails to function, continue with "Coil and Igniter Troubleshooting ," on section 4 below.
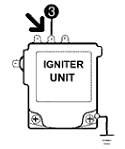
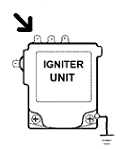
Section 4 - Coil and Igniter Troubleshooting
Below: How to test the igniter and how to test ignition coil with a test light. (Requirements before performing this test: The main relay should work
(section 0,) there should be no spark
(section
1,) there should be coil battery voltage
(section
3,) and the ECU should work (step 5 below.) )
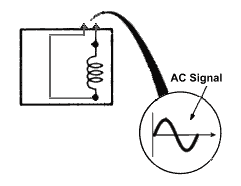
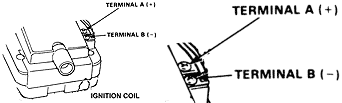
This is a schematic of a basic coil. Terminal A is to the ignition switch and terminal B is to the igniter.
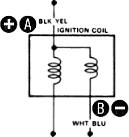
Step 1. Most Honda coils have two or four input. Find and locate terminal B, which will be needed for step 3.
 Third
Generation
Third
Generation Second
Generation, For the civic coil see this [image].
Second
Generation, For the civic coil see this [image].
Step
2. Connect
one end of the test light to the battery (+)
terminal.

Step
3. While leaving the coil terminals connected, probe the other tip of the test light to
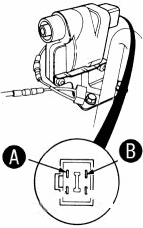
any wire on the coil terminal, preferably the wire or terminal marked ( - ) on the coil. If the wire is not marked then consult a diagram for your
car or use terminal ![]() on the diagram
(marked by WHT/BLU or BLU (the thick lead) depending on the vehicle.)
on the diagram
(marked by WHT/BLU or BLU (the thick lead) depending on the vehicle.)

Step 4. Crank the engine.
-
A blinking light is a bad coil. Replace the coil.
-
No blinking light is a possible bad igniter. See step 5 to confirm.
The next step is only for the second generation electronic ignition. For the first generation electronic ignition see step 6a.
Step 5. Connect the test light leads to the end of the injector terminals. Crank the motor.
TIP: Or simply listen the injectors click.
- A blinking light (or a clicking sound is heard) is a bad igniter (most
often.) Replace with a known good igniter.
- No blinking light (or no clicking sound is heard) means low battery power, no power to ECU or a dead distributor (see Step 6 below to check the distributor.) This concludes this basic ignition test.
Note: Radio noise condenser (others are built into the igniter) can cause the engine to stall or cause high frequency interference, affecting performance. (condenser capacity should be 0.47plus or minus0.09 microfarads. ) Coil resistance checks are unreliable, so it is not included in this page. Checking the coil's resisitance is useful when the spark is weak or if the ignter keeps dying.
Extra explanations for step 5:
The procedure for checking the injector signals show that if the ECU injector pulse signals are working then (most likely) the igniter is OK. Since the igniter receives about the same general signal as the injectors.
No
blinking light can mean that the timing input signals are
not working .)
Q:
What is an timing input signal? A: The pulsing signal from the ECU (which originates from within the distributor or from the cranksaft hall effect sensor) that tells the
igniter when to fire the coil found on Hondas with an electronic timing. You may check step 6 to find your timing signal. (Currently, the
page to test that signal from the igniter (or the ECU to igniter) is still under revision.) For those who want answers immediately, you could use a high impedance digital multimeter (DMM,) instead. For most people, your trouble shooting ends here. Good luck.
Reluctor Sensor Testing
|
Can I measure the reluctor sensor using a DMM or voltmeter? Yes.
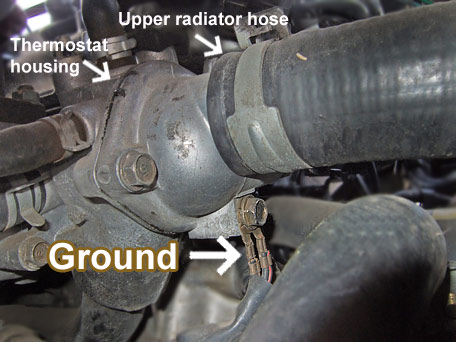
(Notice that a bad main relay (at times) will not supply battery voltage to the ECU. Without the battery voltage the check engine light will stay on with a diagnostic code 16 hidden behind it. This could cause no spark or no (ECU to igniter) timing signals on some vehicles. The second most common problem is the bad ECU ground. Check to make sure the ECU ground bolt is not rusted or corroded right under the thermostat housing probably due to an improper thermostat replacement. |

Miscilenious Info
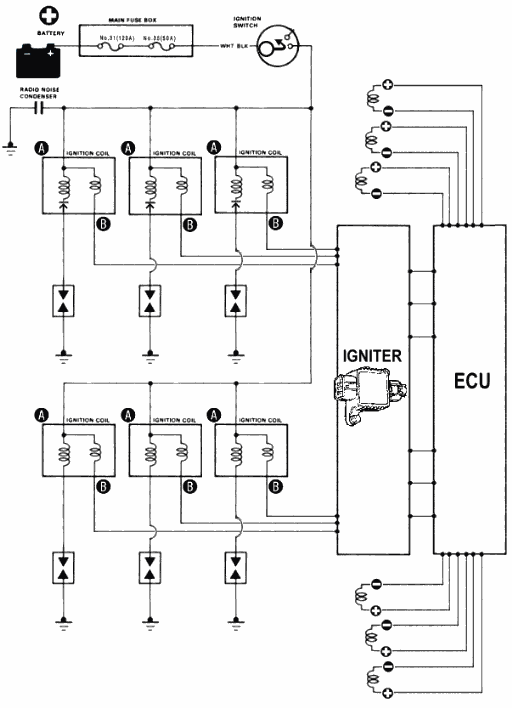
Figure 16. DIS Acura.
How to test a coil on a work bench is under revision.
(This test doesn't test resistance. Testing resistance is often useful when the coil output
is low or have run too hot. A coil that is out of spec may damage the igniter.)
How to test the igniter on a work bench or on-car is still under revision for accuracy.
Testing safety tips:
| Always turn off ignition when not running any tests. Always ground the spark plug wires when performing a compression test. A proper way is to use a remote starter switch that bypasses the ignition switch. If not possible then plug the spark plug onto the plug and lay the plug on a grounded part of the car (metal part of the car) before cranking. Honda design its circuit to be ground safe. This means that a ground fault will unlikely damage most components. (But not where a short is creating zero or near zero resistance). Do not tap or hammer on the distributor (near the coil) with a solid object or your coil may form a hairline crack. |
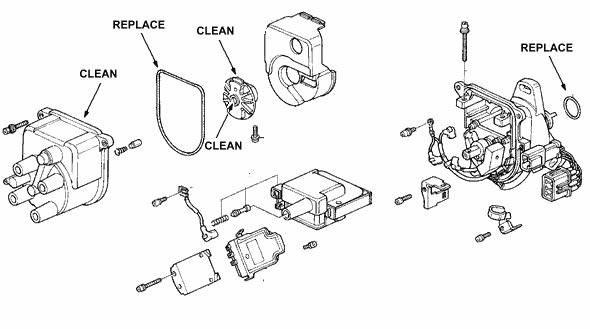
Section 5 - Distributor replacement:
Step 1. Turn ignition OFF.
Step 2. Remove the distributor cap bolt using a Phillips screw driver or a 6mm or smaller socket drive.
Note: If you are disconnecting the ignition wires from the distributor cap mark the location of the wire to the cap with a "white-out" pen. E.g. 1,2,3,4 then disconnect the ignition wires.
Step 3. Remove the distributor cap. Tip: If you are replacing the whole distributor skip to step 4.
Step 3a. Unscrew the rotor's fastener , if applicable, and remove it. If it does not come off, with two flathead screw driver pry it gently not damaging the sensors below it with a cloth.
CAUTION: A substantial shock could destroy the coil. Do
not hammer or tap excessively.
TIP: If the Phillips screw (or fastener) is stuck, remove
the distributor from the car and use the proper tools or crush the rotor with a vise
grip.
Step 3b. Remove the dust cover.
Step 3c. Remove the coil connections and remove the screw to the coil and remove the coil. Careful not to drop it.
Step 3d. Remove the igniter's connections and carefully remove the screw to the igniter and remove the "ignitor."
Step 4. Before sliding out the distributor from the head have a marking material (razor blade) ready to mark the distributor shaft-camshaft end. Remove the distributor then scratch the distributor shaft-to-camshaft end and the engine head to indicate its position required for installation. Forgetting to mark them posses no damage, it simply won't start. And your odds of starting is only 50/50.
 How to remove distributor bearing when the distributor is hot to the touch
 ![]()
| Wire terminal designations: | |
| Terminals colors below are for 90-93 Accords A. Blue for most Hondas/Acuras.
|
Terminals colors below are for 86-89 Accords if applicable. A.
Blue.
|
Installing the distributor, igniter and coil.
Installation is the reverse of the procedure except taking few notes below. If you bought a new distributor but don't know how to install it follow the instructions below.
Steps
-
Line the distributor rotor so that rotor points to number 1 on the distributor.
-
Turn the crankshaft until the timing marks on the pulley or the flywheel points to a white dot near a letter "T."
-
If won't start because a belt slipped a tooth or replacing a timing belt, align the camshaft see above image.
-
Insert the distributor into the head.
-
Tighten a single bolt on the distributor and start the motor.
-
Once it starts and ignition timing is set with a timing light, tighten all the bolt on the distributor (to prevent oil leaks.)

Second generation Civic.
Third generation Civic firing order.
Extra steps. Apply heat conducting grease (heat sink compound)
and electrical connection grease (also known as electrical joint compound) before
installation. Apply a conducting grease on the back of the
igniter during installation will drastically increase the life of the igniter.
<----apply
heat sink compound on the back of the igniter and to the
connections ( for the connections, an electrical joint compound is preferred.)
WARNING: The male/female spade connector should not
be loose on the igniter terminals. If it's loose, use a pair of Slip Joint Pliers
to reduce the gap on the female spade connector before installing. Failure to do so may cause an open when the igniter gets a
little hot. This may stall the car at any moment, especially while going down the road. And should be able restart once cooled down.
Remember, a stalled car may loose vacuum brake assistance. You have to step/push on the brake extremely hard to stop the car after the initial 1st or 2nd press of the brakes. Engaging the parking brake in synchronous with the pressing of the brakes, cranking the motor for the last ounce of vaccuum and down shift also helps. But that isn't preactical for most drivers, unfortunately.
DANGER:
Leave the ignition switched "ON" (after it won't restart) so the dash warning lights are on. This engages all
safety devices such as airbags and belt tensioner systems.
Extra steps. If you suspect a dry bearing, try spraying a small amount of lubricant into the bottom bearing of the distributor shaft inside the distributor using a long nozzle if the bearing is not tightly sealed. (The bearing that is known not to seal tightly has a retainer made of steel. Lubricating could extend the life of a dry bearing a bit. Avoid the sensors. Note: A bad bearing is noticeable by a course sound, a screech sound or a loose or wobbly shaft. A good bearing will spin without any loose or dry feeling and should be left alone. A bad bearing can overheat the distributor, destroying the bearing, the rotor and igniter.
Extra steps. Install a new or a good
condition distributor shaft o-ring, coating
fresh oil on it. Install a new or a good condition
distributor cap o-ring, observing the conditions
of the distributor cap terminal and scrape off any anomalies. A
new
distributor cap o-ring will help seal out moisture during the
rainy seasons which can prevent your car from not starting.
Coat fresh oil
on small o-ring after o-ring is installed---->![]()
 <----Do not coat oil
on big o-ring.
<----Do not coat oil
on big o-ring.
FAQ
Why is my car not starting and keeps blowing 40A under-hood fuse?
If the fuse blows when you turn the ignition switch to start then there could be a problem with your ignition switch, but most unlikely. See link top left for 'ignition switch.'
Other possible answers: A 40A fuse means there is a super wiring short. This is often located along
the fender where salt, acid, coolant or etc, created some electrolysis or such.
Often this white wire exists the alternator near the battery line. Cut, twist
and solder this wire and good to go if it happens to be that. (notice you have
to twist the copper together before soldering wires subect to heat. Crimping is
another alternative.)
Assuming you have individual coil packs or a single coil system. The likely cause could be the main relay. If you hear your fuel injectors clicking (when trying to start) then the main relay is probably not it. Since there isn't much information coming in about the CL's trouble history, you may just have to go thru the troubleshooting steps. The trouble steps on this page are mainly for the single coil system.
Should the negative side on a coil have power on 90 accord?
There should be only positive power on the negative or positive side on the coil when the ignition is "ON."
What if there is only power on the positive side but nothing on the negative side when the ignition is on?
Probably a dead coil. But that's pretty rare. (Note that the coil charges up at startup - in sync with the fuel pump priming. Take your readings after the priming stops.)
If you like your questions to be answered, log out of Google services before searching Google. Your questions are then often posted for viewing to authors of this page. Write your questions in complete sentences. Sorry, the author does not answer question during author's work seasons (which is 80% of the year.) For a bit of privacy try https://startpage.com/ where we can't see your keywords.
 Terminology:
Electronic ignition is an ignition system that uses a transistor and an IC to control the battery current to the coil. Found on the first generation Honda with electronic ignition and thereafter.
Electronic ignition with electronic timing is a system that uses a pre-mapped timing protocols to control timing (as to automatically advance or retard timing.) Found on the second generation electronic ignition and thereafter.
Check fuse(s) On this website, "checking fuse" is referred to a fuse check that probes two pins on top of the fuse (and battery posts) with a test light or a DMM. This checks for power and the condition of the fuse. This method also helps locate shorts. And are widely used by mechanics and electric automotive hobbyist.