|
|
||||||||||||||||||||||||||||||||||||||||||||||||||||||||||
Key stuck
Statistics
|
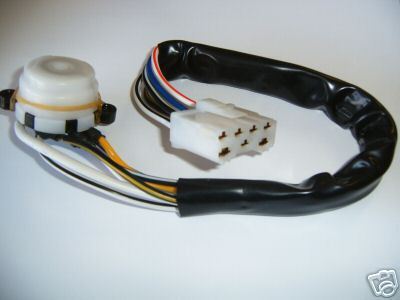
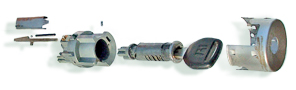 Image of an ignition switch key cylinder |
|||||||||||||||||||||||||||
Overview
The purpose and function of the ignition switch assembly is to:
-
Prevent unauthorized turning of the steering wheel.
-
Prevent unauthorized electrical access.
-
Control nearly half of the car's power needs.
-
Supply nearly half of the car's power needs.
-
Provides a way to start and shut off the vehicle and other electrical accessories.

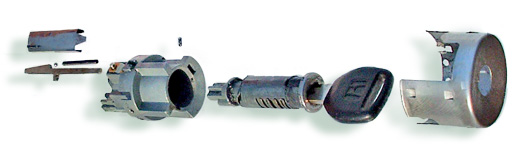
Left: electrical switch. Right: key clylinder exploded view
The electrical switch is constantly on standby and ready to supply or control power to the ignition system, the fuel system, the main computer, wipers, fans, relay coils, active feedback components (such as the speed sensor) and other accessories.
The affected part involves the electrical contact portion of the ignition switch while the ignition lock and key assemblies are not considered to be the problem.
The electrical contact portion of the ignition switch (being the heart of the electrical junction of your car) will be referred to as the electrical switch. There have been no accidents or injuries reported to American Honda related to this issue, however, an electrical switch complete failure will cause a shutdown of all mission critical systems, including the power steering system and braking system, excluding the brake lights. Nevertheless, the brakes will still work for the first stroke of brake pedal but will not work effectively on the second stroke and thereafter. (Apply a firm, steady pressure and come to a stop. Don't pump the brakes to minimize loosing brake vacuum.) Most often, the vehicle can be restarted.
Although, most Honda ignition switches can last the life of the car,
to decrease a sudden stall due to an early wear, the electrical switch can be inspected
and maintained by the experienced. See repair
section ![]() .
.
Honda have recalled several types of electrical switch where too much current have either melted the solder or pitted the sliding contacts inside the switch, stalling the car in traffic. Some switch even develop crud from the factory grease creating an open circuit, stalling the car in traffic. Please take note whether the instrument warning lights immediately go out when the vehicle stalls. Every Honda has to light up the instrument once stalled. A car stalling without the warning lights (while the horns or brake lights work) is an indicator of a bad ignition switch.
 |
||
 |
 |
 |
 |
||
 shorted. This is just a visual aid and not the real event.")
Above*: The end result of arcing is a pitted hole and a possible melted solder joint.
Here's a quote from the TSB
"Electrical contacts in the ignition switch can wear too early due to high electrical current passing through the switch. Worn-out ignition contacts could cause the engine to stall without warning. Although the engine will restart in most cases, a vehicle that stalls while driving increases the risk of a crash. "
Above: Images of several types of electrical switches
How to spot a bad ignition (electrical) switch : Symptoms
- If you start the car and the radio dosn't turn on, then wiggle the key and it turns on.
- Most often, the dash will go dark when the car stalls (no warning lights, no shift indicator, no electrical, except the horns.)
- The speedometer and tachometer drop momentarily and come back up.
- Car runs fine when key slightly held at start position.
- Car stalls then can be restart, then stalls after driving or idling.
- Once started the the car starts for a second and dies after letting off the key.
- In some cases, the ignition key is warmer than normal and the electrical switch is hot.
- On rare cases, all of the gauges go dark when in the ON position but if held between the on and start position they light up.
- On rare cases, if held between the on and start position the system check bulbs light up on the instrument panel.
- On severe cases, when the key turns to ON the usual clicks under the dash is not heard as well as the check system light but the horns work okay.
- In severe cases when the key turns to START nothing happens (no electrical) but the horns or brake lights work okay.
- How to confirm: When white and black/yellow wire on
the ignition switch is shorted the car starts and run fine using the key. Doing this bypasses the electrical switch. (Do
not attempt if you're not certain what this means.) See basic
troubleshoot for a far safer method.
| Figure 2: Typical electrical switch circuit which exclude lights and accessories (that aren't mission critical.) |
|---|
Solution:
Your solution is to decide whether to troubleshoot, repair, replace or contact your local Honda dealer for a free replacement, if applicable. Some people have successfully received a free replacement even though their vehicles were not covered in the recall (but don't quote us on that.) To troubleshoot, repair or replace follow the steps below. If you can't decide then we suggest that you replace the electrical switch if your symptoms fit the descriptions.
Troubleshooting:
There are two ways to troubleshoot. One is the basic test the other is the standard test.Basic troubleshoot: If the car stalls and after starting refuses to remain idling:
- Turn the ignition OFF and restart the car. Once started slightly release the key from the start position (III.) Don't let the key fall back into run position (II) but don't let the starter continue to run. Most often, the car should not stall. If this is the case then the electrical switch is most likely bad.
- On an automatic and the engine is warm, apply foot pressure on the brake, put the car on D then twist the key to start (III) and hold it there. Slide the shifter to "Neutral" then to "Drive" to allow the car to start. Once started, continue to hold the key on START and continue applying foot pressure on the brake. The car should idle. Effectively, the gear selector is your temporary start switch.
- Start the engine and allow the car to stall. Watch the dash lights. If the dash lights disappear completely upon stalling and the foot brake is applied and the brake lights come on then the ignition switch is faulty.
- On a stick shift (manual transmission) another method will also work but requires working under the hood.
Standard troubleshoot: Skills: Requires a steady hand.
Begin by checking for power at the ignition coil (terminal A, black/yellow stripe) with the ignition switched to ON. There should be battery voltage.

For the 88-89 Accord coil, see this [image.] For
the civic coil see this [image].
If there is no power then check the ignition fuse (most often labeled IG (40 Amp)) in the engine bay fuse box. If the fuse is fine but the headlight is dim, check your battery connection. If everything is fine then continue below.
- When white and black/yellow wire on the ignition switch is shorted the car starts and run fine using the key is a sign of a bad switch. Doing this bypasses the electrical switch. (Do not attempt if you're not certain what this means.)
- The following will check for voltages or resistance on the back of the electrical switch or at the end of the electrical switch wire harness connector. To gain access the the terminals see replacement procedures below. Please observe the diagram above (fig.2) which may identify the wire colors that matches your car. WARNING: You will be working in a high current area. No metallic arm bracelets, screw drivers, wrenches or anything that may short the circuit, causing sparks ( or firework displays) and/or heating-up your tools within a fraction of second, causing skin or eye burns during this test. This may also blow out the fuse or cause a fire.
- Start and run the car until the car stalls (but don't turn off the switch) then pick your choice of test below, preferably the one that checks for power at the switch.
Troubleshooting power at the switch:
Tool required: a test light

![]()
Steps: Leave the ignition switch harness connected to the fusebox and the battery connected.
- Connect the negative end of the a DMM (test light okay) to ground (any metal part of the steering column) and the other to WHT. There should be battery voltage.
- Connect the negative end of the a DMM to ground (any metal part of the steering column) and the other to BLK/YL. There should be battery voltage when the ignition is switch to "ON" or the engine is idling and the battery voltage should not fluctuate or drop to less than about 10V.
- Connect the negative end of the a DMM to ground (any metal part of the steering column) and the other to BLK/WHT. There should battery voltage when the ignition is switch to "START."
- If you don't find the battery voltage on steps 2 and 3 replace the electrical switch.
- If you don't find any battery voltage then the harness or the main fuse is blown.
- If you didn't find the wire colors on the wire diagram and you're not sure how to proceed then consult your service manual.
Troubleshooting resistance at the harness connectors:
Steps:
- For your safety, remove the negative battery terminal first. (The radio memory may be lost.)
- Follow the harness from ignition switch to the fuse box. Disconnect the ignition switch wire harness
connector from the fuse box. (Alternatively, you may leave the harness connected and take the
readings at the back of the ignition switch if you're certain the harness isn't the problem.
)
 Enlarge
- Set the DMM to measure Ohm or continuity. Touch the red probe of the a DMM to WHT at the harness connector.
- Touch the other black probe of the a DMM to BLK/YL. There should be continuity when the ignition is switch to "ON."
- Remove the black probe from BLK/YL (but leave the red probe of the a DMM to WHT.)
- Touch the black probe of the a DMM to BLK/WHT and turn the ignition is switch to "START. There should be continuity between WHT and BLK/WHT. There should also be continuity between WHT and BLK/YL."
- If you don't find the continuity replace the electrical switch.
- If you don't find the wire colors as specified on your ignition switch, stop here and consult your service manual.
| WHT | BLK/YEL | BLK/WHT | |
| OFF | |||
| ON (II) | |||
| START (III) | |||
Note: The ignition switch usually fails intermittently under load, meaning they
fail only when the car is running. To troubleshoot you may have to use a voltage drop test or apply load and
measure the voltage drop.
What is the best way to do a voltage drop test? While the car is running
measure BLK/YL and body ground. The voltage should normally read 12V but it should
never drop to less than, say, 10Volts when the ignition is ON or the car is running.
Note: Puncturing the wires to check for voltage is not recommended since the internal wires may exposed to the environment. With every puncture the wire should be sealed with RTV silicone and wrap with a UL approved electrical tape. Avoid damaging the female connector terminals, do not insert your probe deep into the female connector, instead lightly touch the terminal's copper surface.
Note: This diagnose does not cover accessories such as the blower motor and etc. This is because they are not mission critical and are simply luxury items which requires a unique set of procedures beyond the scope of this page.
Repairing/Inspecting:
Skills required: Should at least know how to crack a walnut cleanly in two pieces, eat the center and handle cleaning chemicals.
- Disconnect the battery negative terminal. Have the electrical switch removed from the back of the ignition key assembly. It is recommended that the work area (above the driver side door mat) is clean and well lit. The purpose of this section is to open the electrical switch then inspect the contacts, the solder joints and the spring load tensions for meeting the technical service limits.
-
The electrical contacts are the ring and the surface which the ring slides in a circular motion to divert current inside the electrical switch. The ring is the usual place to check for wear, frozen grease or pits. But both the contact plate and contact rings should be inspected and cleaned.

GOOD This can be cleaned and reused, but must be installed properly.
WEAR Under normal usage there is a slight wear.
WEAR THIN This is at a critical dangerous stage and the #2 cause of stalling. Do not reuse.
PITTED This is a sign of arcing which may have overheated and melted the the solder joints. Do not reuse.
- Further, check the solder joint terminals, if they show signs of overheating then the joints should be desoldered and fixed.
- The benefits of grease are: 1) seals electrical contact points from exposure to air and corrosion. 2) any sparks made during break or make are quashed.
- Caution: Use Electrical Contact Grease, other grease could cause combustion from sparks, harden in the cold or flow under heat. Some can even be electrically conductive. See FAQ bottom of page.
- Caution: Do not mix grease.
- Caution: Do not over apply grease.
- Caution: Use a small precision flathead screw driver to pry open the electrical switch. The switch is made of thermoset plastic and very brittle. If not careful they can break.
- Caution: The electrical switch is lightly spring loaded. Open carefully and do not let the springs and parts fly everywhere. You might not find any help or diagrams to help you assemble the electrical switch.
- Repairing/Fixing: If the contacts are pitted or worn then it's not possible to fix them without using some special tools. However, you may temporary fix it by cleaning the surface then apply a higher temperature rosin core solder into the pits or swap the contact wafers with the non-damage identical ones.
- Inspecting: Upon installation a resistance test or voltage drop test should be performed. If the resistance is too high then the ignition switch temperature could rise - which could melt the solder joints then stalling the car.
-
Disconnect the negative battery terminal (for your safety.)
-
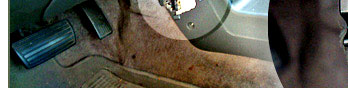
Remove dashboard lower cover.
-
Remove the steering column cover cover. (see image above)
-
Lower steering wheel if possible and if required. (May require removing several bolts holding up the steering column with a deep socket.)
-
Make sure the ignition key is turn to "0."
-
Disconnect the electrical switch harness from the fuse box. This by far is difficult to do by hand. See the image below. Study the connector locking tab on the drawing, the part that is goes onto the fuse box. With a small, short flathead screw driver, insert the screwdriver deep in between the connector's lock tab and the fuse box, all done by feel only. Now push the screw driver towards the fuse box, in a prying manner. The connector should slide right out just slightly. Now, grab the wires (all the wires at once) and gently pull it out, swaying the connector from side to side as you pull it out. If it won't come out, push the connector back into the fuse box as deep and tightly as it will go. Now, retry it with the screw driver again.
-
Remove the two screws from the side of the ignition switch cover with a wrench, monkey wrench or socket wrench. This is done by loosen the two small bolts/screws holding the electrical switch. Once they are loosen, you may then continue to loosen them with your fingers or tools.
Tip: If you are replacing the 94-97 Accord electrical switch you will have to disassemble the electrical switch housing (the blue and clear plastic) in order to install it back in. If you don't want to dissemble the electrical switch housing then you will have to remove the ignition lock assembly first. An improper assembly can result in an electrical short in the fuse box.
-
Remove the old electrical switch, taking note where the harness routes.
-
Route the wire harness to the fuse box the same way the original wire harness was routed and plug it in until you feel a snap and snug. (If not snug your car may stall in traffic.)
-
If you are installing a brand new switch skip to step 7.
-
Place the electrical switch away from any metal parts or body ground to prevent a short for the next step.
-
Reconnect the battery terminal.
-
Use the Phillips screw driver to turn the electrical switch clockwise to start the car to confirm that the car idles for a minute without stalling.
-
Disconnect the negative battery terminal.
-
Step 7: Install the new electrical switch with its original screws onto the key assembly. Make sure the new electrical switch is turned to "0," which is all-the-way counterclockwise. (Otherwise the switch will not go in.)
-
Reconnect the battery terminal.
-
Start the car with the key to confirm that the electrical switch is installed correctly.
-
Install the upper and lower steering column cover and the dashboard lower cover.
-
Finally, only center punch your VIN under the hood to indicate a new replacement if they are replaced with an updated ignition switch supplied from the dealer with genuine parts installed by a certified technician. (this is not for repaired, for used electrical switches or for new switches that is installed improperly.)
-
Punch the bolt head at 3'O clock.
-
Slightly angle the center punch and punch the bolt out counterclockwise.
-
Do the same to the other bolt.
-
Once both are loosen continue to twist the nut using your fingers.
-
Center punch bolt and drill the head off. (Notice the reverse drill bit is used for convenience.)
- Turn switch to the accessory position (I). Press the pin button downward. Pull cylinder out. (Note: Some models have an additional hidden screw on the opposite end, usually right next to the pin. Remove the screw or screws.)
- Turn the key to "O" and align the lock cylinder with the lock body.
- Turn the key almost to "I", and insert the lock cylinder until the pin touches the body.
- Turn the key to "I", push the pin and insert the lock body cylinder into the lock until the pin clicks into place.
- If the key comes out by pushing the shift lever back and fourth while in park then you need to adjust the locknut.
- Put the car in neutral and remove the lock pin.
- Adjust the locknut until you can slide the lockpin into its place with ease.
- Tighten the locknut.
- Disconnect the negative car battery.
- Remove key. (Works on late models, `90+.)
- To eject the lock plug from the key cylinder (or tumbler assembly).
- Remove spring loaded locking mechanism cover on key cylinder and remove the parts and spring. Note the order of the material removed.
- Stick key inside. Twist key to opposing direction.
- Push plug out from the other (opposite) end. (On the 90-93 Accord eject the plug in the direction where the key comes in, but first, remove the steel cover. )
Replacement:
Skills required: Must know how to change cabinet doors. Tools required. 10mm wrench or socket to remove battery terminal. 6 mm wrench or socket. Phillips screw driver. For the 1997 Accord, 1998–99 Accord, 1998–99 Civic, 1997–99 CR-V, 1997–99 Odyssey, 1997–99 Prelude see TSB replacement procedure at bottom of page. For the ignition assembly replacement see "Removing the bolt from the steering column" on this page. 
Steps:
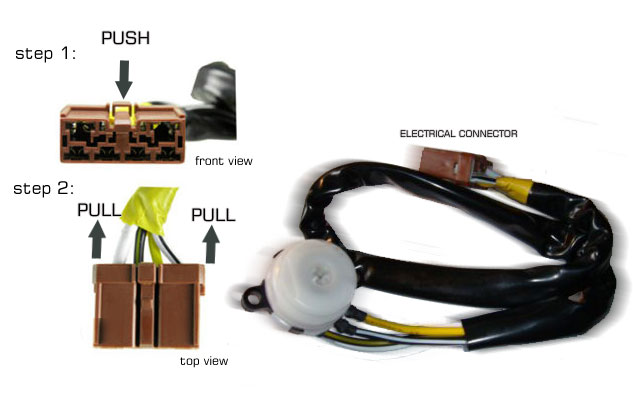

How to release the connector for the 90, 92, 93, 94, 95, 96, 97, 98, 99, 01, and 02 (click to enlarge.) For the 1986-88 the switch will look like this image.
To install.
Removing the bolt from the steering column ignition assembly.
Replacing the ignition switch assembly using a punch.
Security Tips:
If the bolts are easily accessible you might want to consider
putting a locking formula on the threads or mechanically lock the bolts during installation to prevent theft.
You can lock
the bolts, by drilling a hole on the ignition assembly and thru the bolt threads then
inserting a roll pin*
Although, cars are taken using far simpler methods than this, the owner should at least take precautions and use your steering wheel "Club." While you're at it, apply super glue, weld glue or similar on the bracket/clamp and the column before bolting it down. The image that shows you how to punch the bolt has moved. It can still be found here.
Advantages: Auto engages. Low cost. Removable for troubleshooting or velet. Unique switch location. Disadvantages: Requires a hood lock (alternative is to secure the
solenoid expose wirings.) For valet you'll need a bypass switch in series.)
Remember, the Honda Accord is popular for being the most stolen vehicle in America. Consider installing an alarm or what have you, if its a problem in your area. Don't use steel brake locks bars on Hondas. Turn the wheel until it clicks if parked for long periods in a sketchy place.
Replacing the ignition key assembly using a drill.
Replacing key cylinder on 86, 87, 88, 89 Accord.
Note: These steps can be difficult at first. They are here for our technical member's reference and can be quite confusing. Since it's one of the FAQ, we shall explain the best we can. If you've remove the lock cylinder on these models chances are that you'll find some troubles reinserting it, unless you can easily visualize hidden objects in 3D. Note: Honda don't usually sell a key cylinder and you must have the key to remove or install the lock cylinder, or tumbler assembly.
Steps:
How to install a new key cylinder into the ignition assembly uses several methods. The one below is the most practical.
Steps version 1:

Key cylinder (a.k.a. lock cylinder or tumbler assembly.)
Transponder Immobilizer Q and A.
How does it work?
A transponder, built into the key, signals the immobilizer control unit that the key is genuine. If the car is hotwired, or an unauthorized key is used, it simply will not start. This system is a substantial deterrent from joyrider thefts. The immobilizer key is not equipped with a battery. The transponder receives power from the immobilizer receiver.
Can I make a copy of the immobilizer keys?
Yes. You can make a copy from the dealer. For the immobolizer systems you need 2 programmed keys to program a 3rd. Included user programmable features in some years/make/models (may or may not be Honda/Acura) the user is able to program a third key at home providing they have both programmed keys.
What happens if I loose all my immobilizer keys?
The dealer can make a new key based on the VIN or other numbers found on your car if you still have original steering column.
If that's not possible then this will cost a bunch. Since you have no preprogrammed keys the dealer will have them reprogram the ECU and program you new keys.
Basically, what you have to do is buy the whole immobilizer system and it comes with the red (overwrite) key. Then you have to use the Honda PGM-FI tester to reset the system and rewrite the code to a new code. Then you have to cut a new key HOP#(35113-S84-A01) or a (35113-S84-T5 are cheaper) by VIN number and program that key. The learning key (red) will not start the engine and must only be used for re-coding the system.
Can the immobilizer be disabled and bypassed?
Yes. Only for an emergency and with a limited drivable time.
Key Stuck: Removing the key from the ignition switch or fixing seizing problem.
Problem: Cannot remove the key even in park or when the steering is turn left or right.
Solution: If the car uses an interlock device (years`90+) then you may have to clean or adjust the console switch if the P light is not lit or adjust the shift cable link located on the shift selector, but most often the linkage is just out of alignment.
Troubleshoot: Put the selector on P then push the handle back and forth
while still in P. If the key comes off then adjust as follow. 
If the above does not solve it follow this step. What can happen is that the grease freezes up inside the gear selector switch
(located inside the P, R, N, D, 2, 1 gear selector console.) This is a common
problem and the solution is to either spray the contacts with a contact cleaner
or clean the contact then spray the contacts with a contact cleaner. Most often
you will need a 10-mm socket to remove the switch to do any repairs, if you do
so, make sure you mark their positions before removing the switch or otherwise
you will have problem with alignment.
To remove the key immediately see steps below:
Steps:
Problem: Cannot turn key or key is stuck but some keys work or key won't return to the ON position after starting.
Solution 1: You may have a worn key. Either get a new key from the dealer or allow a locksmith to file down the key or tumblers.
Solution 2: Otherwise you will have to replace the ignition switch assembly (but not the lock cylinder.) This involves a punch or drill outlined on this page. The vehicles effected with the bad assembly are listed below.
1996 Civic ALL
1997 Civic
2 door
KC thru VIN 1HGEJ6263VL801505
KE thru VIN 1HGEJ61700L101502
KG thru VIN 1HGEJ61300L101262
KH thru VIN 1HGEJ8232VL037535
KK thru VIN 1HGEJ8237VL023730
KM thru VIN 1HGEJ8237VL670001
KP thru VIN 1HGEJ61700L101922
KQ thru VIN 1HGEJ81100L101442
KX thru VIN 1HGEJ8231VL900003
KT thru VIN 1HGEJ82500L102582
KY thru VIN 1HGEJ7251VL023010
KZ thru VIN 1HGEJ61400L101142
4 door
KK thru VIN 1HGEJ8543VL009909
KV thru VIN 1HGEJ5649VL009247
KX thru VIN 1HGEJ8660VL900031
KM thru VIN 1HGEJ8656TL670001
Problem: Cannot start in park (starter will not spin but all other electrical such as headlights are working fine.)
Solution: If the car starts when the P indicator come on or when the car is on neutral then clean or adjust the console switch located on the shift selector. For the manual transmission, clean, inspect or replace the clutch switch. If there are any alarm starter disrupt, bypass them sufficiently to allow maximum current to flow.
Removing the lock plug from the key cylinder (tumbler assembly).
TSB REPLACEMENT PROCEDURES FOR:
The image-html pages below show detailed instructions on how to remove and install new electrical
switches.
|

The TSB replacement instructions above are cache in our system from the Ignition Switch TSB and may not be current. The most current TSB has been discontinued for public access.
FAQ
What grease do you recommend?
I'd recommend any reputable seller that sells "Electrical
Contact Grease" that's used for electrical connections and switches. Some
sellers could be found on Ebay, Amazon or any trusted typical website or an
electrical department store.
What is the benefit of contact grease?
In my opinion, I believe the grease helps reduce
friction and wear. A thin layer of contact grease can prevent corrosion from
forming. Corrosion forms a dry, rough surface on the copper which can wear out the
switch prematurely. Arcing can also be reduced which is a good thing.
How much of contact grease do you apply?
In my opinion, one or two paper thin layer is fine. Although
the factory switch may tend leave a glob in there. But
wouldn't put so much so that it fills the entire switch box.
I used sandpaper to scrape the contact parts, is it okay?
When sanding, make sure you're using the highest grit 400-800 grit or
even  polish the copper if possible on the final stage.
It should be shiny. This is to prevent copper abrasion which could
wear out the copper contact ring.
Is there a simple method to keep the car running so I can drive to the shop?
To keep the car running on a typical bad ignition switch see
"On an automatic and the engine is..."
 To keep the car running on a 5-speed manual transmission you will need to
jump two wires behind the electrical switch on the ignition switch assembly. Search
for "How to confirm:" on this page for some info, if that helps.
Technical Details:
| PARTS INFORMATION | |
| Electrical Switch: | |
| 1997 Accord – | P/N 35130-SY8-305 |
| 1998–99 Accord – | P/N 35130-S84-305 |
| 1998–99 Civic (left-hand drive)– | P/N 35130-S04-305 |
| 1999 Civic – (right-hand drive) |
P/N 35130-S04-306 |
| 1997–99 CR-V – (left-hand drive, without immobilizer system) |
P/N 35130-S10-306 |
| 1999 CR-V – (left-hand drive, with immobilizer system) |
P/N 35130-S10-405 |
| 1998–99 CR-V – (right-hand drive) |
P/N 35130-S10-305 |
| 1997 Odyssey – (left-hand drive) |
P/N 35130-SX0-406 |
| 1997 Odyssey – (right-hand drive) |
P/N 35130-SX0-405 |
| 1998 Odyssey – (left-hand drive) |
P/N 35130-SX0-305 |
| 1999 Odyssey – (left-hand drive) |
P/N 35130-S0X-305 |
| 1998–99 Odyssey – (right-hand drive) |
P/N 35130-SX0-306 |
| 1997–99 Prelude – | P/N 35130-S30-305 |
| TOOL INFORMATION | |
| (part of Terminal Pin Tool Set, | P/N 07JAZ-002000A) |
| Terminal Pin Tool: | P/N 07JAZ-002020A |
| Operation Number: 725108 | |
| Failed Part: | P/N 35130-S84-A01 |
| Defect Code: | 5B0 (the “0” is a zero) |
| Contention Code: | L55 |