|
|
||||||||||||||||||||||||||||||||||||||||||||||||||||||||||
Statistics
|
|||||||||||||||||||||||||||||||
Useful Tip 1 of 2: |
Is your Honda an investment? Make it a habit to check the temperature gauge every 5-10 miles.
The temperature gauge can tell you a lot about the car's health. The needle moving from its usual position in traffic
only slightly, for example, is an indicator of a failing thermostat.
|
Useful Tip 2 of 2: |
Overheating is one of the most common problem for the summer traveler.
A good trip begins with a positive thought of confidence and a vision of action to take when overheating occurs.
Carry with you a roll of duct tape (for wrapping leaking hoses) and at least 1 gallon of water (preferably 1 gallon plain water and 1 gallon of premix coolant.)
|
Overview
The purpose of the cooling system is to obtain optimum performance, efficiency and emission-An efficient cooling system requires coolant, a heat exchanger, a fan, a water pump, and a thermostat to regulate the operating temperature of the engine for performance, fuel economy and emissions. Since Honda uses a fragile aluminum head, the longevity of the car is dependant on how many overheating the car has undergone. Strictly speaking, the cooling system is second to the oil circulatory system in terms of importance. An overheating engine should be taken seriously. If not, then your cylinder compression readings could be out of specifications permanently, unless the motor is completely overhauled.
The benefits of a good compression with no leaks are seen in many ways. The cooling system that is in good order could increase the life of various electrical sensors such as the O2 sensor. Car parts that include plastics, rubber or electrical wirings could last much longer. Many other internal engine rubber seals or the catalytic converter, for instance, can also enjoy a maintenance free operation for the life of the vehicle. Not to mention that preventing an overheating can help increase performance, emission, economy and/or smooth idling. In essence, the cooling system is essential. This page will help you look for causes and find a practical solution to some of the most common overheating problem the Honda car will face.
Just keep in mind that an overheating engine rarely occurs. And when they do, it is a good opportunity for you to catch them while they do occur. Simply refer to What to do when your Honda overheats which could save yourself from "blowing steam."
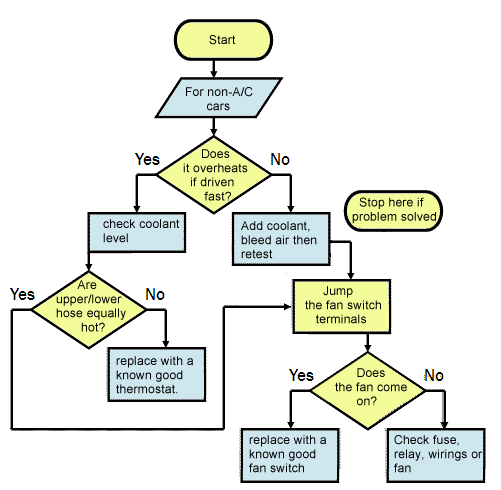
Troubleshooting flowchart (Start Here):
DANGER: DO NOT open the filler cap unless the temperature is on or below the "C" mark. Always put a heavy duty towel (min. 1ftx1ft) over the cap before twisting the towel and cap.
PET HAZARD: If you have pets, clean spills quickly and cover open coolant trays.
NOTE: Please fill the coolant reservior tank up between "Low" and "Full" marks whenever you top off with coolant.
TIP: If you keep adding coolant to the reservoir while you continue to find air in the system or loose coolant after bleeding yet there are no signs of leak or a head gasket leak, consider checking/replacing the radiator cap. The rubber seal on the cap has a typical lifespan of 6 years.
TIP: If it still overheats after replacing the
fan switch but the gauge never reach the "H"
mark. The fans run automatically. This could point to a bad coolant
sensor or you have installed the wrong fan switch.
TIP: Please check the fuses and relays first before going onto harder steps.
 |
|
For non-AC cars (click to enlarge.) Upper/lower hose location
Links on this page:
- General overheating issues
- Fan timer runs continuously solution
- What to do when your Honda overheats, troubleshooting/solution
-
The importance of bleeding
how to bleed - Sensor locations
-
Radiator fan won't come on troubleshooting
How to check a fan switch
How to check a fan relay
>relay test
How to check a fan
How to check the fan's input ground
How to check the fan's input battery power
How to check the cooling system wiring circuit (final step) - How to bleed the cooling system
- How to test a thermoswitch (fan switch)
-
How to test a thermostat
How to troubleshoot a thermostat - About plastic radiators cracking
- How to buy radiators
- Technical details
FAQs
Why isnt my radiator fan coming on?
A fuse (usually 10-15 Amps) may have been blown. Replace the fuse and see if the fan works normally. If the under-dash fuse blows immediately after swapping with a new fuse, check for a short in the relay, in the fan or in the wiring.
If a brand new relay fuse* works fine but will eventually blows again weeks or months later, make sure to swap the fan relay (under the hood) with an identical one. The relay may have shorted internally. If the problem persist then the wiring from the relay to the fuse may be shorting intermittently. If the fan fuse* is blown then the problem may be wiring to the fan, the relay or the fan itself. To pin down this problem you may need to use the wiring diagram for your particular car to help guide you.
Why isnt my radiator fan coming on or coming on but still overheats?
The coolants could be low*, the fan spinning too slow, the relay is bad, the radiator clogged, the fan switch is not working correctly or even a bad thermostat. A bad thermostat can prevent the water from circulating normally which can appear as though the fan switch is working abnormally. Such as the fan will only come on when the temperature is abnormally very high. See thermostat troubleshooting.
How do I know which is the fan switch?
Since both the high and low temperature fan switch look almost identical and there are lots of Honda models with different color coding, there are methods that help mechanics know the difference between the cooling radiator fan switch versus the fan timer condensor fan switch.
If the thermoswitch's terminals are shorted and the fans run while the ignition is ON then that's the lower temperature switch (cooling radiator fan switch). This switch is often located near the lower hose. If the thermoswitch's terminals are shorted and the fan run (often only one fan runs) while the ignition is ON then that's the higher temperature switch (fan timer condensor fan switch).
How can test my relay?
Swap the relay with a working relay or see relay testing.
Why does the fan come on every time I turn off the engine, even on cool normal day on an even, flat road, but does not come on when the engine is on?
It's normal for the fan to come on after shutting off the engine during times when the engine is working hard on a hot day or even on a cool day. If it comes on all the time it could be because of using the wrong type of thermostat or the thermostat that is wearing down. Always try to use a Honda genuine thermostat whenever possible. It could also be because of using the wrong type of thermoswitch or it could be caused by trapped air. If the fan comes on immediately (0-1 sec) after shutoff it's probably caused by someone mixing up the connector plugs, installed the wrong parts or a dead thermoswitch switch.
Tip: Try to avoid putting "stop-leak" or similar products into the radiator. It may decrease coolant flow permanently and causing it to run a little hotter, which may set off the fan everytime the key is switched off after a short drive. Also, make sure the timing belt hasn't slip a tooth.
Proper operation: A number of Honda/Acura with an advance cooling system employ a fan timer system to offset the fragile aluminum head. The timer allows the fan to know when and how long the fan should operate. By switching the ignition off and the coolant temperature exceeds the boiling point the radiator fan will kick in. (However, both the condenser fan and the cooling fan will run when the A/C is on at any temperature.) The fan timer should run for no more than 15 minutes (or much less on some cars) if the engine temp is over 223F. If it is running greater than 15 minutes, or the fan going on/off randomly while the ignition is on or off then either the fan timer is bad, the fan relay, or perhaps there's a bad connection somewhere. If the fan timer system fail to turn on the fan, serious damage to the head and head gasket could occur some time in the future. If the fan runs every time you turn off the engine, you've probably plug the switch to the wrong sensor, the cooling system has poor coolant circulation, you're driving in a hilly terrain or it was just a hot day.
Problem: The fan runs continuously (longer than 19-minutes) when the key is removed. The symptom is a dead battery. The fan turns off only when the ignition is turn ON (not off, correction) and while the high temperature thermoswitch (108 degrees) is checked out okay then 90% chance the fan timer is bad. Usually happens to the 90-93 Accords. If the fan runs after removing the key on a cold engine then something could be wrong with the high temputure thermoswitch. After the key is removed and the engine cold and by plugging the high temperature thermoswitch back in and the fan runs then the high temperature thermoswitch is bad. (error in this section is spotted by a honda-tech.com member)
Solution: The reasonable solution is to replace the timer control unit. Before replacing the unit it would be prudent to troubleshoot. When the fan does not turn off after 15 minutes swap the cooling fan relays in the engine fuse compartment with another identical relay. If the fan refuses to turn off replace the fan timer unit.
Replacement: Remove the access panel on the driver's kick panel and search for a box way in there the size of two cigarette packs with 8-terminals. The 86-89 Accord fan timer unit is located under the passenger seat. Unbolt the unit and swap it with a new one.
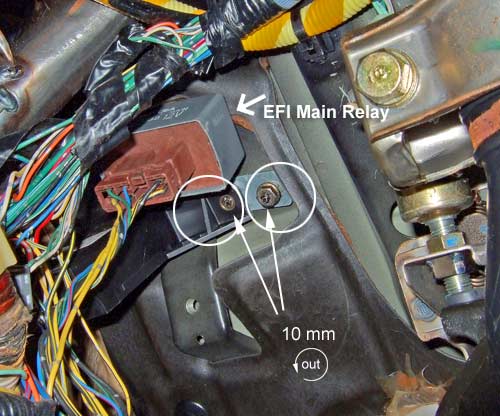
Note:
the fan timer location is a bit more to the right compared to this
image. It's right next to the main relay like this
image (as seen the
main relay removal page.)
Problem: General overheating issues. An overheating engine is characterized by the climbing of the needle which may eventually reach the red mark on the temperature gauge. The normal operating temperature of a normal Honda is 89-90-degrees Celsius. During hill climbing the needle may climb but it's not considered to be overheated if the needle doesn't reach the red mark.
The owner should first check for the most accessible and simplest problems. Here are some overheating problems you should check for:
- Are the fuse for the fan blown? (fuses under the hood and under the dash)
- Are coolant flow blocked?
- Is the thermostat stuck-closed?
- Is the thermostat broken? symptoms, troubleshoot, test
- Is the thermostat missing?
- Has the air been purged (thru the bleed bolt)?
- Is the fan relay working?
- Is the fan switch working?
- Is the fan working?
- Is the radiator cap working? Releasing fluid? Evaporation thru a broken cap?
- Is the radiator holding pressure? (leakage?) Solder or seal joints bad?
- Is the timing correct?
- Are the radiator fins blocked from bugs?
- Is the radiator clogged from corrosion?
- Is the radiator expelling pressure (Head gasket problem?) or evaporating from the exhaust manifold?
- Is the cooling system hoses leaking? Thru pinhole leaks? Look for white dried splash marks inside the engine bay.
SCHEMATIC
|
90-93 Accord fan timer unit is
under the dash, right next to the main relay. It's the size of two cigarette packs.
86-89 Accord fan timer unit is located under the passenger seat the size of a cigarette pack. CRX cooling system diagram (below)
|

Left Figure 1. 90-93 Accord circuit shows wired connections between the ECU, timer and sensors and relays.
Solutions and Troubleshooting: What to do when your Honda overheats.
Whenever the needle climbs past the normal mark while idling or at a moderate speed on a level road, follow these steps to troubleshoot:
-
While the vehicle is going towards overheating, turn on the A/C. (Tip: turning the heater dial and the heater fan to its maximum may aid in the cooling of the engine.) If the temperature continues to climb, turn off the AC and follow step 2 immediately. If the temperature drops while the A/C is on, leave the A/C on and drive to a service station or drive home then check the water level, the fuse or the fan switch, otherwise follow step 2.
-
Pull over in a safe spot while the needle continues to climb to the red mark and shut off the motor. If you need to continue driving, wait until the needle falls below the red mark. (DO NOT allow the needle to be at or above the red mark for an extended period with the motor running. The damage may or may not be immediate. ) ::T::
-
Turn the ignition to ON, not start. While sitting on the driver seat, and opening the car door,you may be able to feel a gush of hot air from under the car if the fan is working.
-
After a few minutes, raise the hood to cool down the motor and confirm that the fan is running.
CAUTION: For your safety, move away from the hood of the car after raising the hood to avoid any sudden hose or tank bursting. Tank rupture usually occur a few seconds after the engine turns off or after the engine comes to an idle from normal driving. -
Patiently watch the needle until the needle points to the normal operating temperature mark. This will confirm that the temperature needle is working. (Avoid adding coolant until the temperature cools down completely.)
-
When the temperature is this high the fan(s) will run with the ignition on but will also run with the ignition off on cars with a fan timer (such as the Accords.) Make sure the fan runs while the ignition is on or off. If the fan isn't on turn off the ignition to allow the auto fan to kick in, otherwise leave the ignition on for no more than 15 minutes or sooner to protect your cylinder head. Beware that older batteries could drain and strand you.
-
Next, place your hand on the upper hose and then the lower hose and feel the temperature difference. (CAUTION): The hoses will be as hot as a freshly boiled egg - please use common sense. If there is a difference then the thermostat is most likely dead. CAUTION: Avoid the automatic start fans.
How to loosen a cap on a hot engine:
To refill the radiator, place a heavy duty rag over the radiator filler cap and loosen the cap after the temperature needle is below the C mark. Twist the cap counter-clockwise only one click then stop and listen, allowing a bit of steam, hissing and water to escape. Once the hissing stops, proceed to remove the cap slowly. Start the engine and refill the reservoir and filler neck with the proper mix of coolant and water (or just plain water) then close the cap tightly. If there is coolant leaking due to a crack or ruptured radiator or a serious hose leak put the cap on but don't close the cap to avoid loosing coolant rapidly. Use duct tape to temporarily repair the cooling system plumbing until you arrive home safely. Finally, and at your convenience, follow the bleeding procedure (after bringing the coolant back to the proper mix of coolant and water) at the bottom of the page or after finishing with the repairs.
WARNING: Risk of scalding yourself and bystanders. Risk of eye exposure. Removing the cap on a hot motor under pressure can send coolant flying at a radius of many yards. Always allow the engine to cool down completely and always use a heavy duty rag to cover the filler neck before opening, except when the exhaust manifold is cold to the touch. Always have at least a gallon of clean water readily available to rinse yourself and/or others. Aloe vera plant is a good skin burn treatment.
-
Thermostat troubleshooting: On a cool motor and the coolant at the proper level, start the motor and allow the engine to warm. Feel the upper radiator hose leading to the engine. You should feel a surge of warm coolant (within minutes) when the thermostat opens. If you don't feel the surge then remove the thermostat and boil it in a pot. If the thermostat passes the pot boiling test then check for a poor water circulation in the cooling system.

-
Coolant flow troubleshooting: Open the filler cap. If the coolant refuses to flow normally at the filler neck, bleed the coolant, check for a clogged radiator, check for an eroded water pump impeller or test the thermostat. If the coolant flows but bubbles are also seen flowing along with the coolant then most likely the head gasket is broken. The head gasket failure indicates that the engine has undergone overheating in the past. The solution is to replace the head gasket after confirming it with a leak down test.
-
Overheats at high speeds: If the car overheats at high speeds or under hard accelleration then the timing could be off, the engine is lugging, fins blocked by bugs or the coolant is low.
The importance of bleeding. Whenever the cooling system is drained (or simply adding more coolant because of a leak) always purge the air from the cooling system during refilling. Improper bleeding may lead to poor fuel mileage, underfeeding and/or overheating. The sensors may not be in contact with the coolant and could give false readings or erratic readings. This could lead to erratic idling or overheating. And, at times, the radiator fluid in the reservoir will seem to boil. Air in the system may also lead to corrosion or other un-immediate damages. Bleed according to the instructions for that particular model. Refill the system with the recommended coolant to avoid corrosion or an early water pump damage.

Figure 2. 90-93 Accord.
Sensor Location:
- Fan Switch (aka thermoswitch) for the 86-89 Accord is located at the bottom of the radiator.
- High temperature fan switch for the 86-89 Accord is located next to the bleed bolt. (Short this switch with the ignition off and fan should come on while the ignition is off.)
- Fan switch for the 90-93 Accord is located near and downstream of the thermostat.
- ECU temperature (TW) sensor for the 86-89 Accord is located next to the high temperature fan switch, farthest from the bleed bolt.
- The Civic and CRX thermoswitch is located at the rear of the engine cylinder block.
Radiator fan won't come on troubleshooting:
Remember to check all fuses first. Also, a broken thermostat can disable the fan. Run the engine and turn on the A/C. If both fans work with the A/C engaged then there is a chance the thermostat is dead, the thermoswitch is dead, or the coolant too low (only on cars with the thermoswitch mounted high up, e.g. 90-93 Accord.) See Solutions step 6 for a simple thermostat troubleshooting. Otherwise continue below.
 Figure
3.
Figure
3.
The Civic and CRX thermoswitch is located at the rear of the engine cylinder
block.
Step 1. Checking fan switch. Disconnect the radiator fan switch connector (a.k.a. thermoswitch, located downstream of the thermostat) and turn on the ignition, then jump (or short pins K and L ) on the harness (see figure 3.) Does the fan come on?
Yes.
-
Coolant level low. (Only on cars with the fan switch not mounted on the bottom of the radiator.)
-
Air not purge (go to step 4.)
-
Thermostat stuck closed. Test the thermostat by boiling at Procedure 6.
-
Thermister bad or giving false readings due to trapped air.
-
Thermoswitch bad. Test the thermoswitch by boiling at Procedure 5.
-
Water pump impeller missing caused by electrolysis. Open filler cap, water should flow with thermostat removed or when the engine is at operating temperature.
No. Check relay at step 2.
Step 2. Checking relay. While still jumped from step 1, unplug the relay. Do you hear a click from the relay?
Yes. Relay is working. Fan may be dead. Swap with an identical relay in the relay box or > test the relay to confirm. Then go to step 3 to check the fan.
No. Most likely no power, check the fuse or ignition switch. If fuse is OK, swap or > test the relay. If the relay is found to be good then repair the open in the wire harness leading to the relay. This may require an extensive harness troubleshooting.
 Figure
4
Figure
4
Step 3. Checking fan motor. Apply battery voltage to the fan connecter terminals A and ground to terminal B (the terminal on the upper part of figure 4.) Does the fan come on and spins fast?
Yes. Possible bad ground or power. Go to step 3b then step 3c.
No. Bad motor. Replace motor.
 Figure
5
Figure
5  Troubleshooting
tool: connectors
Troubleshooting
tool: connectors
Note: Avoid jamming larger objects into the female connector.
Step 3b. Checking input ground. While still jumped from step 1, connect a fan lead directly to the battery, while the other lead goes into the harness's ground terminal. (See illustration on figure 5. Note: To determine which is ground on the harness simply try one terminal, either A or B at a time.) This method will check the ground lead for operation. Does the fan come on?
Yes. Possible open in battery lead. Go to Step 3c or Step 3d.
No. Bad ground (only if motor spins on step 3.) Repair the open ground.
Step 3c. Checking input battery power. You may skip this step and go directly to Step 3d if you have a test light. This step is the reverse of the above steps. While still jumped from step 1, connect a fan lead directly to a good ground, while the other lead goes into the positive terminal of the fan connector. (There are no illustration yet. Note: To determine which is ground on the harness simply try one terminal, either A or B at a time.) This method will check the battery lead for operation. Does the fan come on?
Yes. Possible open in the ground lead. Repair the open ground to the fan.
No. There is an open in the battery power lead. See Step 3e, the final step.
Figure
4
Step 3d. Checking input battery power. While still jumped from step 1, use a test light or a multimeter and probe pins A or B (the terminal on the lower part of figure 4.) one at a time with the other lead to body ground. Do you see voltage?
Yes. Your problem is intermittent. Try the steps again during the symptoms. Disconnect the jumped wires.
No. If fuse and relay is confirmed OK then there is a bad positive battery lead or the connection in the harness. Repair the bad wire.
The final step in electrical troubleshooting.
Female radiator fan relay terminal:
 Figure
6
Figure
6![]()
 Figure 1.2 Basic Honda diagram with no timer.
Step 3e. Checking for a bad cooling system wiring and for bad components by using a process of elimination. First make sure you've tested the fan and it works. This is your final stage in troubleshooting for cars with a relay.
Connect one end of the test light to the negative battery terminal. Unplug the relay and with a test light check terminal A, B, C, D one at a time at the car's relay port with the ignition OFF and ON. For example connect test light to port A and turn ignition on and off, then connect test light to port B and turn ignition on and off and so forth. At least one terminal should light up and turn off. If it does light up and turn off then eliminate this terminal as the potential fault.
Turn off the ignition. Connect one end of the test light to the positive battery terminal. With a test light check terminal A, B, C, D one at a time while you jumped (short) and un-jump the thermoswitch terminals quickly. At least one terminal of A, B, C, D should blink. If it does then eliminate this terminal as the potential fault.
Disconnect the fan connector. Connect one end of the test light to the positive battery terminal. With a test light probe pin K and L not at the fan side connector but the other one. At least one terminal should light. If it lights then go to the next step.
For this test to work correctly, first fix step 3 if there is a problem. Connect the battery terminal. Connect one end of the test light to the positive battery terminal. With a test light check terminal A, B, C, D one at a time with the fan connector connected and unconnected. At least one terminal should blink. If it does then eliminate this terminal as the potential fault.
With the information you've obtained, compare them to the chart below.
- If you've found no flashing light on all the terminals then you're working on the wrong relay port.
- If you've found all steps to be OK and the fan switch is okay then replace the relay.
Bleeding procedures.
|
Figure 2. 90,91,92,93 Accord. Bleed bolt. |
Bleeding procedures 90-93 Accord:
Bleeding procedures 86-89 Accord (similar to 88-91 Civic:)
Procedure 4b. Purging Air. (same as procedure 4) Turn the temperature (climate) dial to its maximum. Loosen bleed screw (see figure 2.) Fill radiator until no air bubbles are seen from the bleed bolt. Close the bleed screw (7 lb-ft.) Run the motor with the radiator cap off until the fan comes on twice and continue to top off with coolant mix to bring the level back up to the bottom of the filler neck. Put the radiator cap back on.
 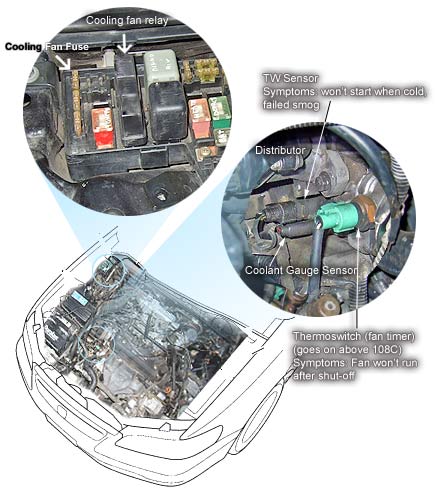 Figure 4. 90,91,92,93 Accord. Sensor and switch location. see figure 2 and figure 3 for fan switch location. |
Procedure 5. Testing thermoswitch (after performing steps 1.) Clip an Ohmmeter to the radiator fan switch (thermoswitch.) Suspend it in water. Heat up the water. Just about a sec prior to seeing a rush of bubbles from the boiling water the thermoswitch should close, showing zero Ohms on the Ohmmeter. If not replace the thermoswitch. NOTE: Avoid confusing the thermoswitch (93 degrees Celsius radiator fan switch) with the other thermoswitch (108 degrees Celsius AC/Fan timer switch.)
NOTICE: Don't put the sensor under a propane torch or flame. The sensor will not give any useful readings and will burn itself out.
NOTICE: The above steps involves boiling, the most accurate way to test the sensor. When the sensor is still attached to the car, the coolant may not be flowing, may have air pockets, may be low or may be affected by other phenomenon. That's why testing it outide of the car is recommended.
Thermostat testing procedures:
Procedure 6. Testing thermostat. Suspend the
thermostat in water. Heat up the water. A sec prior to seeing a rush of bubbles from the
boiling water (or based on the thermostat temperature stamped on the thermostat) the
thermostat should open slightly and continue opening. After the maximum amount of bubbles are seen the
thermostat should have already open fully (8 mm
(0.31in.) If the thermostat won't open fully replace the
thermostat.
Random overheating: If the thermostat opens but fails to open at the exact time on the next attempt to boil the water again then the thermostat most likely needs replacing. A lazy thermostat could cause a random overheating. It's highly recommended that you replace with a genuine Honda thermostat for best results and reliablity. The usual expected lifespan of a genuine thermostat is about 5-6 years or even longer.
Radiator:
ALERT UPDATE: Replace the plastic radiator as soon as possible if you find any indications of a hairline crack on the radiator. DO NOT REPAIR. Sometimes you may notice white spots on the plastic radiator. Sometime coolant is seen weeping from out of nowhere. Sometimes you can't find a leak anywhere because the crack is growing and spreading internally. Always consider an all metal radiator as a replacement.
-(9/01/14)
Problem: A common problem for the third generation Accord
is the crack on the upper plastic radiator tank. The crack will
cause a major leak in no time unless the cap is open to relieve pressure while
driving the vehicle. The crack forms a 3" external crack
but will be about 8" on the inside. The nylon is crystalline and crumbly on the
inside. Ignoring this problem (after seeing signs that water is trickling thru the plastic radiator tank) may result in a bursting tank without warning and strand your vehicle. For second genration accords, the upper tanks can burst if they're not supported with steel.
NOTICE:
Continue driving an overheated engine will result in a cascading destruction.
A number of sensors, seals or the surface of the head may be affected.
Solution #2: Keep your cooling system in good shape and the coolant level correct. An overheating engine or a low coolant level could increase your odds of cracking the plastic radiator. If you still own a plastic radiator, consider upgrading to a brass radiator soon. Especially if it's over, roughly, 15 years.
How to buy radiators: Brass radiators are available. They are easily repairable with a
propane torch, flux and solder and the quality ones are very long lasting. The cheaper brass radiators
are characterized by their poorly soldered joints. Over a short time the solders need to be
reflowed. Plastic radiators are fine if they are
supported correctly, although we've seen many burst while the vehicle overheats.
Plastic tanks that are engineered well has a rounded "D" feature when viewed sideways, similar to roadway speed bumps. Angles or large flat surfaces do not hold pressure well. These D shape tanks can also burst, so it's recommend that you reinforce it with steel, for example, a thick gauge coat hanger wires. Important: Plastic tank between 13- 20 years old mean it's time for an inspection or a precautionary replacement: Some plastic ones have shown to burst as low as 5-6 years. A burst tank will likely strand you.
Water pump:
Problem: Water is leaking from the right side of the timing belt cover, the water pump weep hole or from below the timing belt cover. Coolant is found on the ground.
Solution: Replace the water pump seal or the water pump. Prevention: By changing the coolant at their recommended interval and using a coolant made by Honda is said to slow down the decay or crack to the water pump seal. The decay is shown in the two linked images below (seal A, B.)
(Authors thoughts on "Water pumps are design to fail just so they can rob you commentary":
The water pump is actaully design to last the life of the car.
I found this out after atempting to rebuild the water pump. I could not find
new seals for the pump so I did something to the pump that made it
leak-proof, possibly forever. I began to realize that the industry is requiring
people to change thier water pump unnessarily. Pointing this out is probably
politically incorrect, since this is changing the industry's standards. I'm
not about to get into technical argument with the standards. I dearly hope
that change is coming. More and more people are begining to wake up.

The nature of cracks on seals: Based on my experience, a typical generic 50/50
mix coolant and water kept at a proper level is much better than simply
plain water. Cracks usually form when there is thermo shock. Plain
water are poor shock absorber for temperatures changes, therfore a generic
brand of coolant (that is okay for aluminium) is just fine. Just putting plain
water in there is simply neglect.
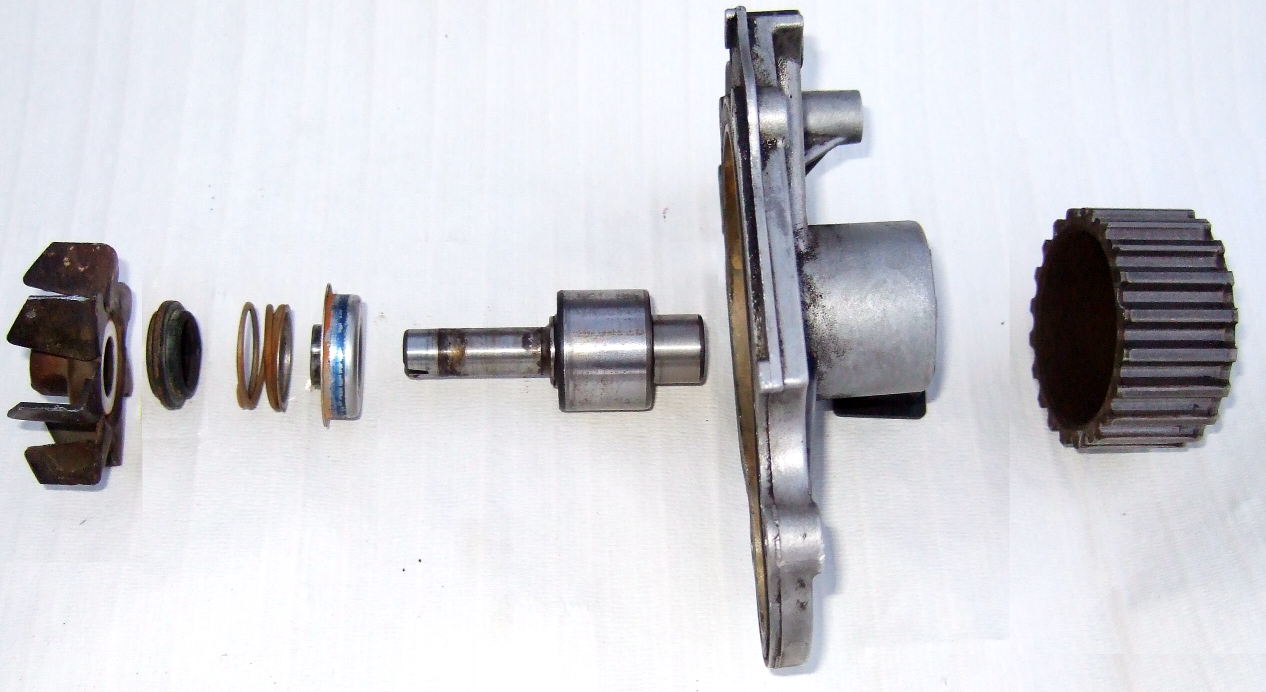
Dead water pump exploded view. View images of seal
A 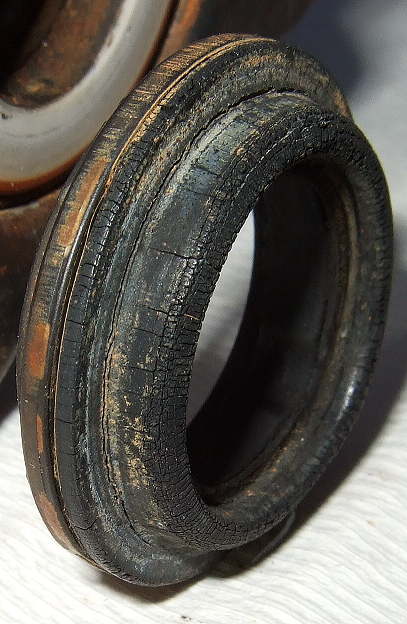 and seal B
  . The two seals can be replaced if they are
available. The bearing seals shows no problems or had ever come in contact with fluid.
. The two seals can be replaced if they are
available. The bearing seals shows no problems or had ever come in contact with fluid.
Technical details
- The thermister is a sensitive ceramic resistor on the basis of barium Titanate. Its resistance changes with temperature.
- System is under high pressure when engine is hot. To avoid the danger of releasing scalding coolant, remove only when engine is cool.
- Do not mix different brands of coolant.
- Do not use additional rust inhibitors, they may not be compatible with the recommended coolant.
- 50/50 mix of coolant and water.
Manual ..................................................... 3.2 US Quarts Including heater and reservoir
Automatic.................................................. 3.7 US Quarts Including heater and reservoir
Cap pressure (hold test).......................................... 14-18 PSI
Radiator pressure (hold test)................................... 14-18 PSI
Standard Thermostat:
Lift height.................................................................
above 8 mm (0.31in)
Start Opening (do not let thermostat touch pot surface.)... 76-80 degrees Celsius
Fully Open................................................................90 degrees
Celsius

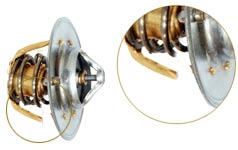
Above left: Genuine Honda thermostat breaks after 2-years in service.
Symptoms: overheats only at idle, fan runs, and minor coolant loss
(expelled.) Thermostat opens only 40-70% of normal height.
Fixable: yes, and still in service.
Expected factory part lifespan: 5-6 years. Expected failure date after fix:
May 2010-2011. (UPDATE: It's now Sept 2014, still going strong. It's been 9 years.)
Switches:
Thermoswitch (radiator fan) .................................... ( 93 degrees
Celsius) 30 lb-ft
(Above boiling) fan switch................................. ( 108 degrees
Celsius) 30 lb-ft
Definition and terms for switches and sensors :
Coolant Temperature Sending Unit: Sends temperature readings the instrument gauge.
Coolant Temperature Sensor (TW): Sends temperature readings the ECU for feul economy.
Coolant Temperature Switch (Thermoswitch) #: Switches the fan on or off.
Coolant Temperature Switch (Thermoswitch) #: Switches the fan on after car shuts off. It
cannot switch the fan off. It switches on above or at 108 degrees C.