Troubleshooting ECU Symptoms.
- Troubleshooting ECU Symptoms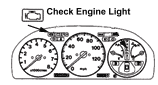
Overview: Whenever the "check engine" light is constantly on or never comes on and won't start is an indication that:
- The ECU doesn't have battery power (e.g., bad main relay, bad fuse)
- The ECU doesn't have ground
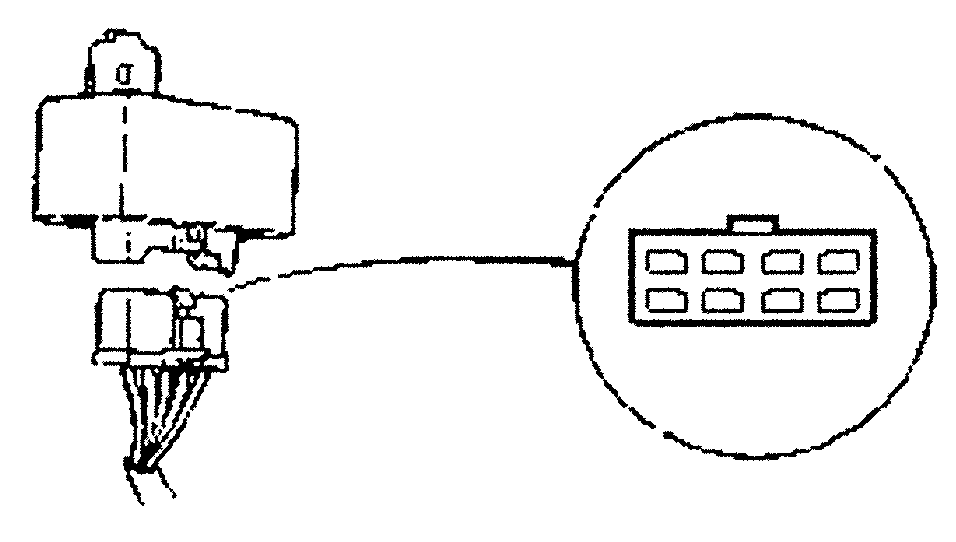
- The ECU doesn't have a direct working connection between the ECU and its feed sensors (eg., crank sensor - see animation on figure 2.)
- The ECU is dead (code zero is a dead ECU*)
Normally, the "check engine" light should come on for two seconds then turn off automatically when the ignition switch is switch to on. A check engine light that stays on is a lucky sign. This should be simple to diagnose because the trouble code(s) can be read and the solution will switch the check engine light off. Troubleshooting with the help of an ECU trouble (CEL) code is the simplest form of troubleshooting. These are just some of the ways that computers can help the car owner.
Follow these guidlines and five steps below carefully and thoroughly to avoid missing any possible clues. Hiring a technician can cost you 85USD an hour to troubleshoot. (Tip: Try to avoid unnecessary expenses, don't replace the ECU unless code zero is found, the ECU is flooded with water with the battery connected or you know what you are doing.)
| ECU Symptoms Probable Causes | |||
| No check engine light after turning the key to ON | Bad ground | Bad battery | Bad supply power |
| Check engine light stays on after turning the key to ON | Blown 7.5A ECU fuse | Bad sensors | Bad main relay |
| When retrieving the code the CEL stays on, won't blink | ECU is bad | Shorted bulb | code ZERO |
Below blinking in bold animation: won't start if they are bad.
 Figure 2.
Step 1. Power supply. Check for an optimum power supply by observing the dash lights during cranking. There should be little or no dimming, flickering or going on and off of most of the warning lights during cranking. Use a multimeter if you have one to check the power supply.
Step 2. Check the ECU fuses. There should be power on the fuse labled ECU in the under-hood fuse
box. See this image below.
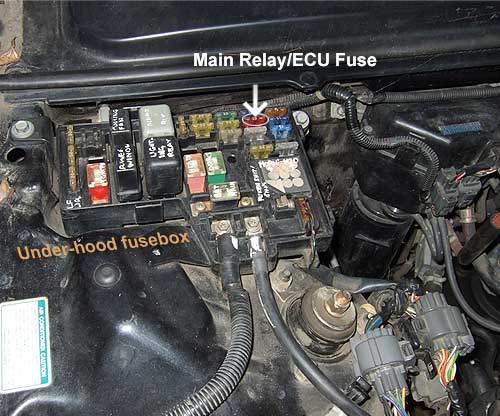 92 Accord
If there is power then continue below. On this website, "checking fuse" is referred to a fuse check that probes two pins on top of the fuse with a test light or a DMM. This checks for power and the condition of the fuse.
Step 3. Retrieve
the code. The code is important. It will tell you which sensor(s) (required to make the ignition spark) are either dead or missing.
Sometimes a fuel related part may fail but won't show any codes - this is when you will
need an extensive troubleshooting flow chart which is not covered on this website.
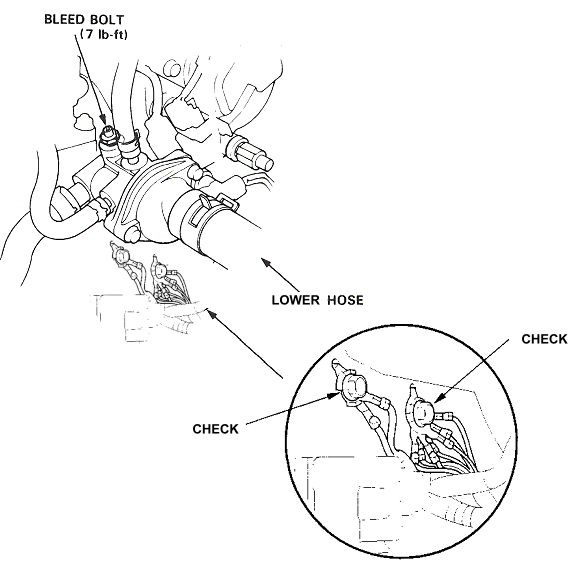
Step 4. Check all ECU grounds. A blown (un-fused) circuit is almost always located near a ground source. Whether the ground is inside the ECU or bolted to the car frame or on the engine block. The ECU ground is bolted to the thermostat
housing or the engine block (usually below the thermostat housing.) Follow a
couple black wires to a bolt. Make sure they are secure. One of the symptoms of a bad ground is no check engine light after turning the key to ON (II).
Check harness for poor bolt contact surface, wire copper corrosion, loose or broken internally.
Step 5. Check the ECU. Make sure not a single trace of the PCB traces are burned. Here is a picture from Honda-tech forum that apears to show the result from a short. http://honda-tech.com/showthread.php?t=2815857&page=2#28
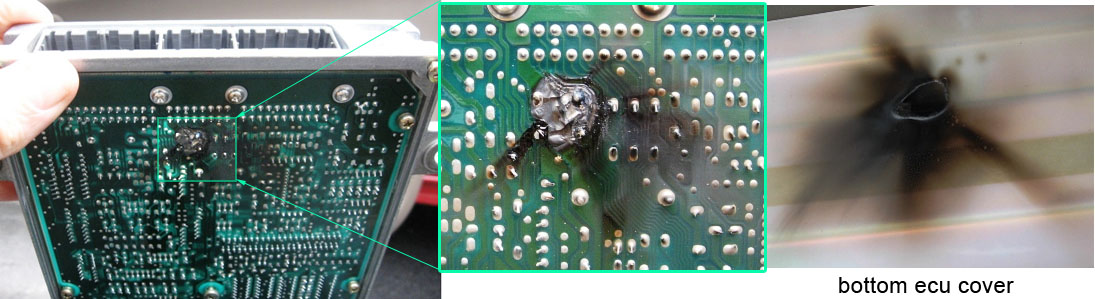 93 Civic
A
short in the wiring harness or a short inside the ECU may cause a short to the ECU's PCB traces. Before
installing a new ECU make sure the short (if any) in the wiring harness are gone. Often
the traces can be soldered back together using a thin (hair) thin strand of
copper. Once the hair strands won't burn off any longer during a test run, a
thicker copper strand is soldered permanently in its place. Keep in mind
that a short can be limited only to the inside of the bad ECU.
Step 6. Check the main relay.
Make sure Yellow/Blue and Yellow/Black has battery
power with the the key on an the relay still connected. Dead main relay = check engine light.
If you hear the main relay click and see the check engine light goes on then off when you first turn on the key then most likely the
main relay is fine. For details on how to check the main relay power see http://techauto.awardspace.com/mainrelay.html#Troubleshoot
The main relay ground is connected to the black wire. Where this ground is bolted (to the frame of the car) is still a mystery. :(
Step 7. If all the above are fine then check the power and ground input on the ECU ports.
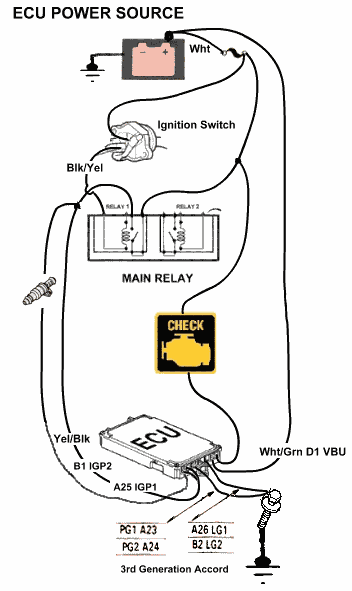 Figure
3: This drawing shows what is a complete wiring for the ECU power supply. They consist of three battery power input and several grounds. If you
did not find a trouble code from the ECU, check these wirings for loose or
broken connection. On other Honda models there may be more grounds than are shown here.
Figure
3: This drawing shows what is a complete wiring for the ECU power supply. They consist of three battery power input and several grounds. If you
did not find a trouble code from the ECU, check these wirings for loose or
broken connection. On other Honda models there may be more grounds than are shown here.
Msc. Details
One component is left out on the drawing on figure 3 (above) which are the injector resistors. This Yel/Blk wire should connect to injector resistors. If the ECU doesn't detect a power source to the injectors the Check Engine light will stay on. As long as all the power connections are connected on this drawing, including feed sensors not depicted in the drawing, the check engine light should turn off.
The ECU constant power supply is protected by a 7.5A fuse located on D1 on the ECU, not shown in the images. The 7.5A fuse should be unplugged to reset the ECU. Always check the fuse properly by using a test light or a multimeter.
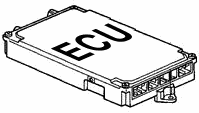
The ECU is located at either the center console, the passenger kick panel or under the driver seat.
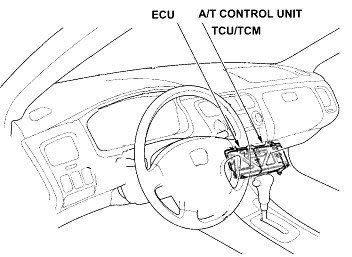
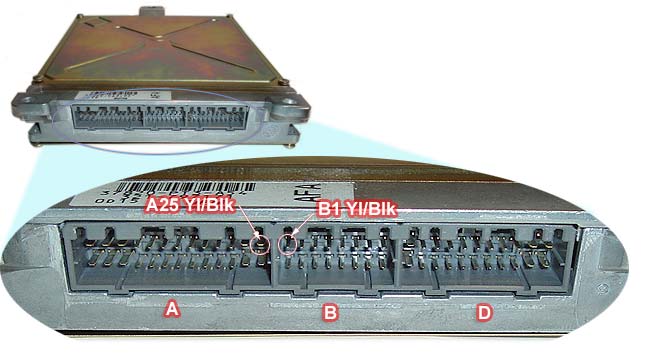 Figure
4: 92 Accord ECU
Figure
4: 92 Accord ECU
Above: The ECU battery power (+) can be checked here (A25, B1 and one
other location which should be checked under the fuse box label 7.5A
ECU or clock fuse; for the 90-93
Accord) and the ECU ground can be checked under the
thermostat housing. Overall there are three battery power input
and several grounds to the ECU. Only two power input ports are shown above.

92 Accord ECU Fuse Reset Location
How can I check to see if my computer is working?
You can check for the reference voltage and whether the injectors are working.
-
Check for 5-Volt reference volts at various sensor such as at the throttle position sensor.
-
Check and make sure the injectors are working. Bring your ear very close to the injectors, there should be clicks while cranking.
How can I check if the ECU is working with a test light?
Steps:
- First listen with your ears for clicks from the injectors while cranking. There should be clicks. If not then continue below. In a noisy environment, a mechanic's stethoscope [image] is used.
- With a test light, connect one end of the test light to the positive battery terminal.
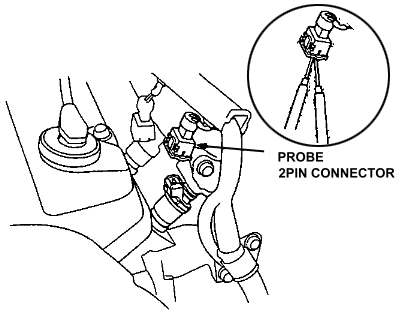
- Probe one of the injector terminals (try one at a time.) Normally, the light should blink when engine is cranking. The standard procedure requires removing the injector connector. [see image]
How can I check for injector power from the main relay?
Steps:
1. With a test light, connect one end of the test light to the negative battery terminal.
2. Probe each terminal on the back of the injector connector (try one terminal
at a time.) Turn on the ignition and you should see the test light glow on at
least one of the terminals.
3. The method to check for fuel pressure (on homepage) should tell you if your
injectors are working.
3.If you hear clicks from the injectors while cranking the injectors are working.
The check engine light and/or D4 will blink a code when the service check connector is jumped (shorted) with a set of jumper pins.
Instructions:
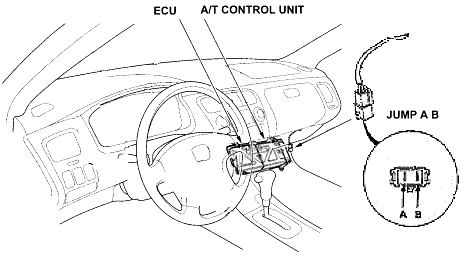
- Look for a two pin connector on the right kick panel on the passenger side. (no jumping required for the 88-89 Accord (which has a blinking LED under the driver seat) or Civics look for blinking red LED on the ECU.)
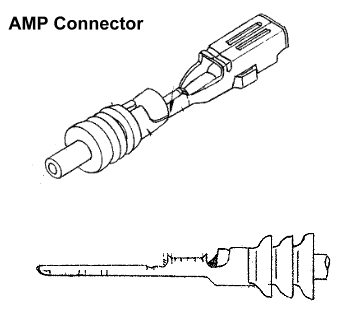
- Use a paper clip, or an AMP male connector jumper. [image]
- Turn the ignition to ON (II.)
- Read the number of blinks and write it down on a piece of paper.
 retrieve
the code
retrieve
the code
ECU Diagnostic Trouble Codes (Generic)
1 O2A - Oxygen sensor #1
2 O2B - Oxygen sensor #2
3 MAP - manifold absolute pressure sensor
4 CKP - crank position sensor
5 MAP - manifold absolute pressure sensor
6 ECT - water temperature sensor
7 TPS - throttle position sensor
8 TDC - top dead centre sensor
9 CYP - cylinder sensor
10 IAT - intake air temperature sensor
12 EGR - exhaust gas recirculation lift valve
13 BARO - atmospheric pressure sensor
14 IAC (EACV) - idle air control valve
15 Ignition output signal
16 Fuel injectors, (Main Relay) - noted by Techauto
17 VSS - speed sensor
19 Automatic transmission lockup control valve
20 Electrical load detector
21 VTEC spool solenoid valve
22 VTEC pressure valve
23 Knock sensor
30 Automatic transmission A signal
31 Automatic transmission B signal
36 traction control found on JDM ecu's
41 Primary oxygen sensor heater
43 Fuel supply system
45 Fuel system too rich or lean
48 LAF - lean air fuel sensor
54 CKF - crank fluctuation sensor
58 TDC sensor #2
61 Primary oxygen sensor
63 Secondary oxygen sensor
65 Secondary oxygen sensor heater
71 random misfire cylinder 1
72 random misfire cylinder 2
73 random misfire cylinder 3
74 random misfire cylinder 4
80 Exhaust Gas Recirculation insufficient flow detected
86 ECT Sensor (Engine Coolant Temperature) circuit range / performance problem
90 Evaporative Emission Control System leak detected in the fuel tank area
91 Fuel Tank Pressure Sensor low input
92 Evaporative Emission Control System insufficient purge flow