Accord door will not open seized latch solution.
|

Introduction: Door will not open from the outside, usually on the driver side, usually affecting 90-91 Accord. If this hasn't happen to you yet, you might consider bookmarking this page in case it unfortunately happens to you. The information will be updated once in a while. The door handle from the outside feels like the door is locked. The solution is to use a drill and release the latch or to destroy the latch and the striker with a drill. There are several more photos and videos added since I've got too many requests for this problem. Select one of several options below. But drilling a single hole from inside the car has to be the easiest method. Just go to step 1. Or try the most popular harder method, see drill hook.)
|
Videos |
|
||
|
|
|
||


|
FAQ: Would you happen to know where I can find a diagram or something that might help me drill open the door on my 1999 Honda accord (or any year car) without having to drill more than one hole? I might have a solution that will work on many cars but I have no diagrams. This involves taking measurements from the passenger door. Here is a detailed explanation and alot of work involved and require some skills. For those that just want to open it fast quick then try drilling out the latch after getting the door panel off. In order to avoid destroying my latch I managed to find the location where to drill on the car body frame by overlaying the markings and holes I made on the passenger side door and door frame. I had to do it this way because I wasn't about to break a repairable latch. I mean, I repair actuators so, it's heart breaking to destroy it while knowing that I can repair it faster than waiting in line to buy a new one. I had took out the door latch on the passenger side door and I look for a spot where I can poke a release lever on it to open the door. A spot that will never likely fail and will always pop the door open when I push it, like the one seen on the video on the right. I use a caliper to measure the spot where I am to drill on the door in comparison to the latch. Then I put the latch back in. I then drill that hole on the door panel. I put a big chewed bubble gum on the hole and close the door. I open the door and the gum sticks to the car frame. I center punch the gum and car frame then I drill one layer of the door frame. There are several layers. I insert a transfer punch (what is a transfer punch) (with no sharp end in first) into the hole on the car door I'd just made and make sure it's sitting smack on the lever. I close the door softly until the transfer punch goes into the hole in car frame and touches the second steel panel inside. I reach in an grab the transfer punch while I keep it steady and not moving. I then open the door holding on to the transfer punch. I then hammer once on the transfer punch. I then drill into the mark I'd just punch and into the car interior (I remove the interior panel so I don't damage it.) Now, I have a perfect hole. I can use this hole as a reference mark. I can use it to drill the driver door, I just have to mirror the calculations. To make my reference point, I find three key points on the door frame that share the same key point on the driver door. I use a caliper to measure the key points to the hole where it's to be drilled. After measuring, I punch a hole then drill. After I drill one hole, I insert a transfer punch into the hole. I measure again with my caliper (in according to the measurements on the passenger door) and I punch a mark with the transfer punch then I drill a hole and keep going until the door metal layer is drilled thru. At this point, I would miss the lever that pops the door open, so the door did not open. I increase the size of the drill bit and then I insert a round steel with a flat end and keep poking. When I hit the lever, the door pops open on it's own (without pushing on the door.) Once the door opens, I remove the door panel and then remove the latch and repair the broken gears with Gorilla super glue and spring steel to reinforce the gears (by using a drill.) Empowerment: For every problem, thank the universe that the sun still shine, the tools are still available (even if they are not,) the brain still working and
a well made car parts that is still broken. With this recipe, you can have a fulfilling life. 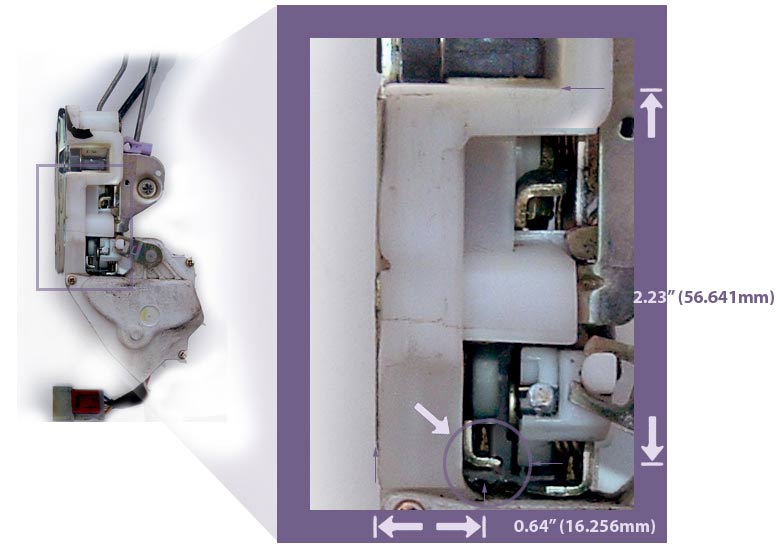
Figure 4 This is the basic information you'll need to pinpoint a spot to drill the
driver side door latch. Simply drill then push the "L" steel peg, usually the drill bit itself pushes this steel peg. This latch
is mirror identical to the passenger side.
|
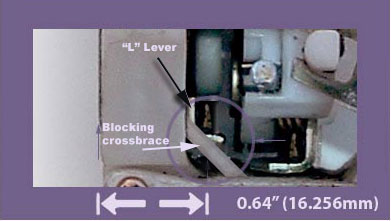 Notice
the blocking plastic cross-brace which wasn't shown above. Most likely,
you will see this piece of plastic in the way. You can drill it out of the way
or go around it. Once it's drilled out then you can see the "L"
steel peg in detail.
Notice
the blocking plastic cross-brace which wasn't shown above. Most likely,
you will see this piece of plastic in the way. You can drill it out of the way
or go around it. Once it's drilled out then you can see the "L"
steel peg in detail.
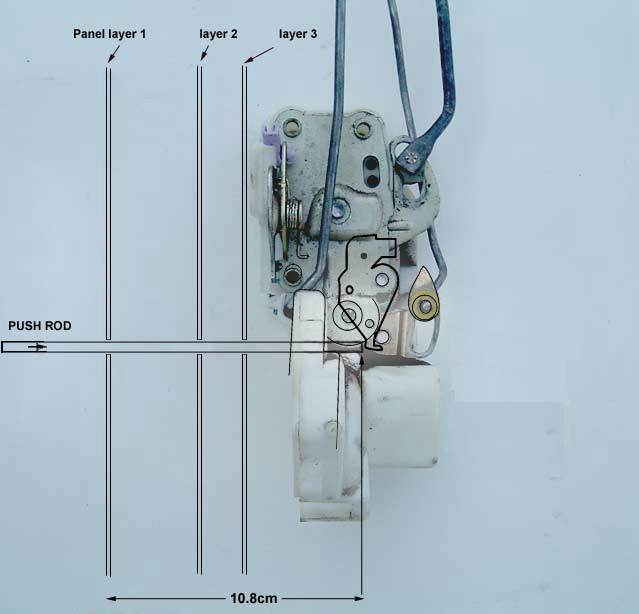 Figure 4.1 Diagram of a poking rod. Hook method is not easy. |
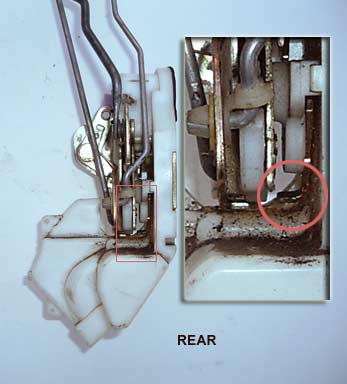 Figure 4.2 View from the rear of the latch (what you see when you are viewing from outside the car.)
 |
Welcome to the door problem issue. This problem has plague many people and a few have perfected a way to drill the door without damaging the latch. This page demonstrates that a single drill bit and a steel rod can pop the door open. By precisely drilling the door you may be able to spare the latch or the door from destruction. Sometimes you may want to fix the latch mechanism (which is possible, but not easy.) The latch can also be replaced.
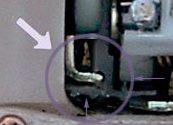
The images on the right shows a sweet spot on a door latch and actuator. Whenever the latch jams, do everything first like using the keys, opening from the outside or pulling the internal rods. If all else fails then drill a hole on the car frame and door and push the "L" shape steel peg (or pawl, shown in the circle above) away from you. This image is a guide that will help you pinpoint a spot for drilling if your car.
What you will do on this page. You will drill a peep hole on the driver side body/door panels about the size of a pen. Then you will poke for the "L" shape pawl with a metal stick (preferably with a rounded flat end) until the door pops open on its own. Continue poking until the door opens free. See first video. The image above is accurately measured from a 92-93 4D Accord driver side - which may be similar to the 90-91.
 |
Figure 5: The area to drill on the driver side may be different on various
models. You may have to take the measurements from the passenger side if
your car isn't a 92-93 4dr. Click on the image. Then remove the plastic
seat belt panel cover and drill that hole.
Notice: The hole shown here is not very accurate because it does not give you the hypotenuse. You need three hypotenuse. I don't know how to give you the hypotenuse because I'm not sure where to measure the hypotenuse from and make it simple. You may have to buy the jig instead... that's the easiest way I know of...or wait until I post the measurements when I have it figured out. |
 |
How accurate should I drill?
The drilling has to be just right. (I have no hypotenuse reference mark or some kind of template yet). Once drilled you may shine a light thru to see if you've missed the mark. Drilling a larger hole helps and it can be patch up with an electrical tape. Drilling so many holes could weaken the support.
You will be looking for the "L" shape steel peg which may be blocked by a plastic crossbar. A flashlight and a mirror may help. |
|
How deep should I go? 10.7 cm or as far as three layers of steel. You'll feel three layers then stop then check. If it's all perfect then punch the drill bit right thru, aiming for the peg. Or replace the drill bit with a flat end steel rod, which can do better.
|
 Figure 6 This drawing shows a latch assembly without a power lock. The power lock model has 4 bars. |
Before you begin.
- Make sure that the door is not stuck because of a heavy rain which glued your door overnight.
- Make sure you can open the door by pulling the outside handle and unlock the door then open the door. Make sure you try several different combinations. These locks are notorious for jamming for no apparent reasons.
- If you don't like the idea of drilling then you can remove the door panel (you don't have to remove the seat) and fiddle with the internal mechanism inside the door panel. You can even try to pull the unlock handle with a pair of pliers.
- How to remove the door panel: Unscrew a screw on the door handle. Pop the door clips (this is done by using an "L" shape tool to pull the door towards yourself, click on figure 7 and you'll see a bunch of anchor clips you must pop.) Remove the inside door handle cover and the handle by removing a screw (there is one other screw you won't be able to remove) then push the door handle sideways before pulling the handle towards yourself. Pull the door bottom forward towards yourself then push the door panel upwards.
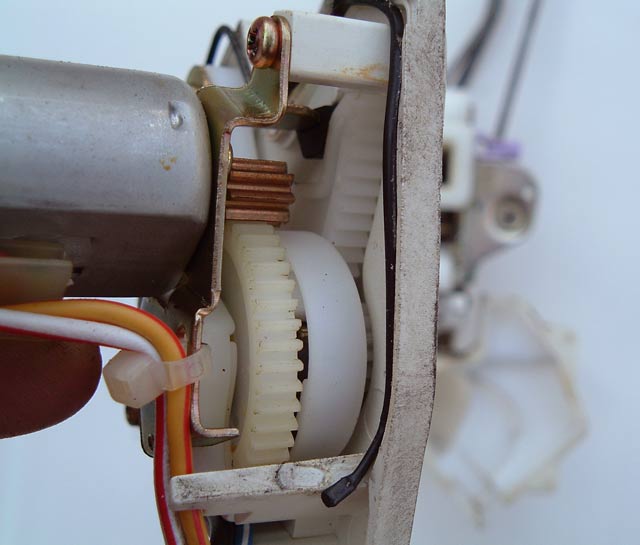
- The drilling method I'd done did not destroy the latch. If we hadn't drill precisely then the door latch is destroyed. I'm not fond of destroying parts that can be fixed. Sometimes the actuator plastic gear itself is broken causing the inability to unlock the door. If, on the other hand, your door unlocks all the way but won't open then one of the plastics on the latch mechanism is broken. Either, way, you can make another one out of aluminum using a precision lath or buy a new latch. Plastics are easier to fix. I was confident enough to repair the actuator gears and reassemble them on cars we own. We don't know what people will do to their cars but, hey, good luck.
Steps for precise drilling to release the latch. Option 1
Steps: (I'd added some changes to the steps and added a few senseless instructions in case some of you don't know what I mean, but it's still priceless.)
- Step 1. Figure 5 above is for the 92-93 Accord. That is the spot you'll drill exactly perpendicular to the door. If you think this is not the same as your car because it's a two door or from other years then go to step 3. (As far as I know the same latch fits the 90, 91, 92, 93 Accords.)
- See Figure 5 and drill that
hole about 10.8 cm then use a rod to pop the door open. Most often
the drill bit will catch the paw and pop the door open. If that didn't work then use a bigger bit and a flash light then look for the "L"
steel peg (shown in several images above.) If you still can't find the "L" steel peg
then see below which helps find a location to drill.
Side note: The steps below is complicated. You might just drill a bigger hole and use a flashlight to locate the steel peg.
- Open the passenger door. Here you will try to pinpoint a good spot to drill and catch the paw and release the latch but don't drill anything yet.
- Once a spot is pinpointed in Area B or Figure 4 (that's about 16.85mm + 1.5mm for the door sheet or 17.35mm from the door's edge and 56.64 from the latch) of the passenger door, put a reference mark on the door.
- Tape a ball bearing on that mark. ( I don't know what you can find, but be creative. )
- Slam the door and you should have a mark on the inside body frame on the passenger side.
- Now drill a perpendicular hole thru two sheet steel.
- Go inside and remove the plastic cover and find that hole.
- Take the measurement from the passenger side and transfer the measurements to the driver's door where you will drill right thru three panels, the third being the door steel frame and right thru to the paw inside the latch assembly. (See first video above) You may have to drill a couple 1/4" holes before hitting the jackpot. You will have to patch the door panel once you're finished.
- Now, start with a small bit that inscrease the bit to the maximum size, but no deeper than 10.8 cm.
- After drilling poke a long flat tip rod to find the paw so the door can pop open. If all goes well the door will pop open.
- Replace the latch by removing the three latch mounting screws and other parts. See "How to replace the latch assembly" below.
Other Ways to get the door open:
- Remove the driver car seat.
- Remove the screws on the driver's door panel.
Figure 7 Honda door panel clips - Pushed the panel back toward the inside of the car and remove the top corner of plastic sheet from inside the door to get to the latch.
- At this point you could either pull or push on several rods and steel pegs inside the door to reset or break free from what ever is jamming the mechanism. If that didn't work go to the next step.
- This step requires three method of drilling. Two version drills drills one point. The other drill five points to release the latch panel.

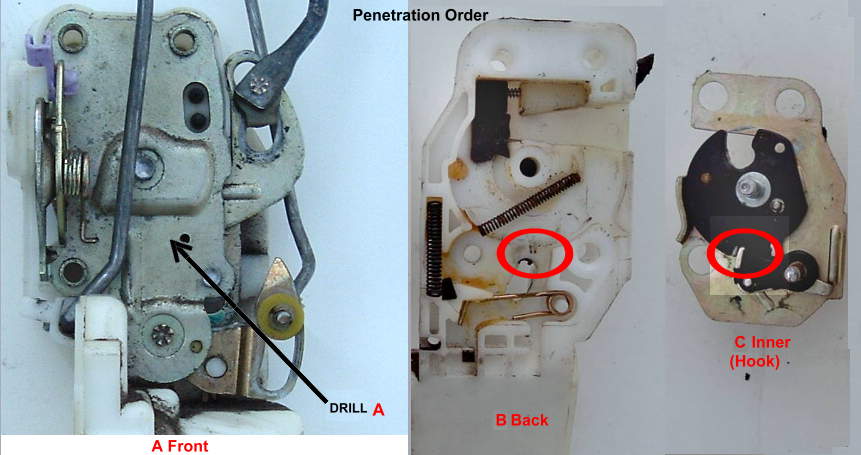
Steps for drilling the hook. (most people use this method, requires removing the door panel.)Option 2
(I think this is the second most easiest place to drill.)- Drill the point indicated by the arrow A with a with about 1/2" (but no less than 1/4") drill bit. You can be off by 1/2 an inch (or drill on that tiny hole next to the arrow) but you must wiggle your drill bit as you go in or stick a flat head screw driver in there and yank it up and down.
- Otherwise, drill deep and wide enough to destroy or cause the hook to move, the hook which is shown on image C.
- As you pull out the drill bit (while at the same time yanking the drill up and down) push the door outward to force the hook free.
- If the door still won't open, use a bigger drill bit.
- Once the door is pushed open, the latch is destroyed.
Steps for drilling latch panel to move the inner mechanism. Option 3
- Drill two layers of steel on Area F on the image below.
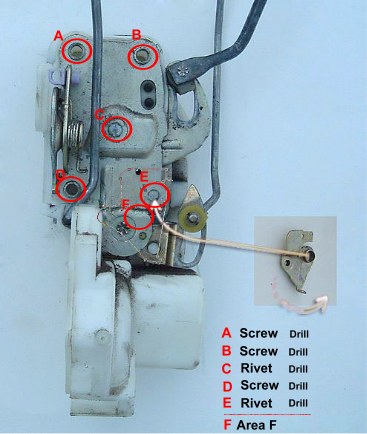
- Then insert a flat screw driver then force the steel peg (shown) to swing counter clockwise.
- The door should pop open on its own energy.
Steps to drilling latch screws and rivets to access the steel peg. Option 4
- This method is a guaranteed way (and probably more dignified way, if your tool permits) to remove the latch panel out of the way so you can swing the steel peg counter clockwise shown above.
- Drill E, D, C, B and A in this order until they are not securing the latch panel. The orders allows you to peel the panel off after reaching C.
- Once they are drilled off the panel should come off easily without effort.
- Then swing the steel peg shown counter-clockwise.
- The door should pop open on its own energy.
Tip: Tech2tech website (is expired) describes the "sweet spot" as 1-1/16" vertically down from the center pivot rivet and ~ 1/8" left of this vertical line from the rivet. From the picture on the Tech2tech website, the hole is approximately centered vertically along and just to the right of a vertical embossed ridge or just above the star shaped rivet (not visible on this drawing above.)
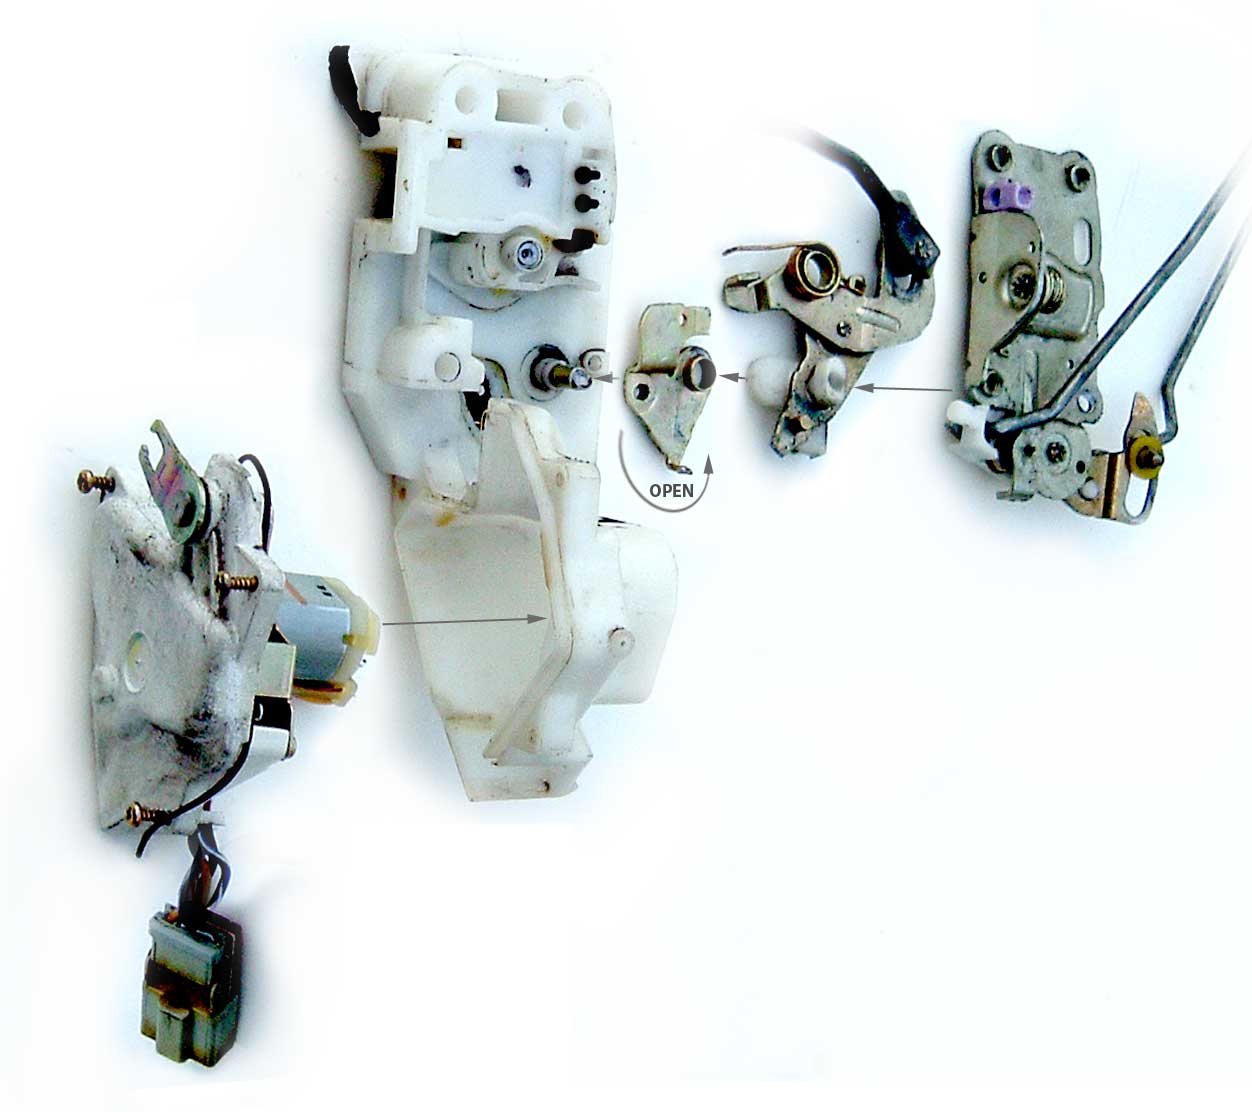
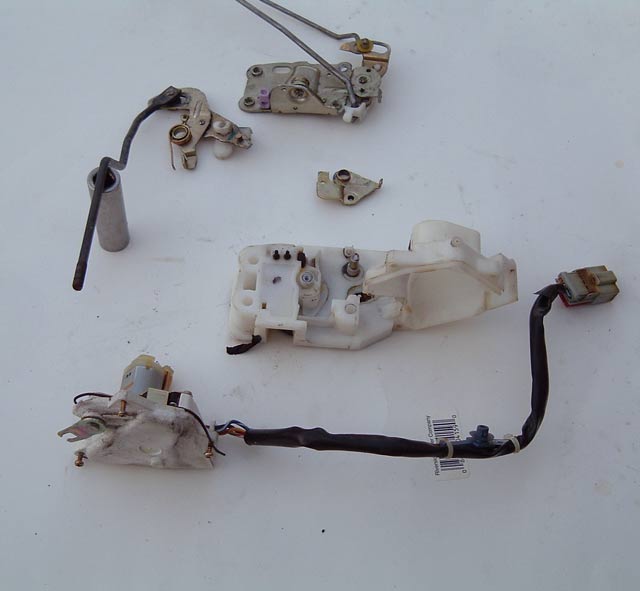
Exploded diagram view of the Accord door lock actuator. Enlarge.


How to replace the latch assembly
Steps.
- Remove the inside door handle cover and the handle by removing the screw then slide the door handle to the right before pulling the handle towards yourself.
- Remove the door panel by unscrewing three screws on the door handle. One on the door handle, one on the door left pocket and one after opening the door.
- Pop the door clips (this is done by using two large flat head screw driver to pull the door towards yourself, click on figure 7 and you'll see a bunch of anchor clips you must pop carefully or they'll break. Put the screw driver on both sides of the clip before pulling them straight forward. For the experience just use all your fingers to grip and pop a clip at a time.
- Pull the door bottom forward towards yourself then push the door panel upwards.
- Unbolt the outside door handle and remove it by twisting or just leave
door handle where it is then remove it at the same time as step 7.
( Caution: Don't bend the rods or you won't be able to put it back in. You can bend back the rod but that requires more thinking and waste time.)
- Unbolt the window guide bolt (left bottom) with a 10mm wrench.
- Unbolt the latch mounting screws and remove the latch from the door.
Installing the latch.
- Installation is going to require many steps but I will focus on the important part of the procedure.
- The outside door handle has an unusual clip that is attached to the latch mechanism. Protect the door from scratches with a drop cloth. That clip may have to come off before installation begins in order to ease the installation. Removing the clip may be easy or hard but you will need a pair of bottle-nose tip pliers and a flat watch repair screw driver.
How to remove the clip. See drawn image.
- Stick the pliers inside the smaller portion of the clip then
- pull towards yourself.
- Insert your small flat head.
- Then push the pliers away from you.
- Now push down on the steel stud.
If you're certain it won't damage it try the driver technique. (no guarantee.)
Installation from this point should be easy, just make sure you don't bend the actuator bars. If the bend the bars then the bars won't fall into their slots. You'll have to bend them back.
Drilling the striker and the latch. Option 5
Introduction: For some of you who have serious door jams the best solution is to drill the striker and the latch. This is very time consuming and drill bit will have to be sharp. If you can fit a drill inside the door panel you can drill the latch into destruction. Otherwise do these steps.
Steps:
- Open the passenger door and try to pinpoint a good spot to drill and break the striker and release the door but don't drill anything yet.
- Once a spot is pinpointed on the passenger latch assembly (point A) and a reference, take the measurement from the passenger side and transfer the measurements to the driver's door where you will drill right thru the panel and into the door steel frame and right thru to the striker inside the latch assembly. You may have to drill a hole matching the diameter of the striker to destroy the striker. You will have to patch the door panel once you're finished.
- If all goes well the door will pop open.
- Replace the latch and the striker.

Tip: An old door latch assembly from junkyard or a new door latch assembly might be worth the time and investment to guide this operation.
Note: Door may be damage in the process.
Admin: testing
(27.12.2005, 10:16)
Joe Shrouder: Hmm... it seems the drilling location is a bit vague, but no matter. You can just drill several holes below the striker area and if you get lucky, it'll pop open. You still won't need the latch anyway. Thanks, man. You saved me $500.
(27.12.2005, 10:21)
Mark Anderson: Good morning,
-
- Where is the least expensive place to buy the replacement latch/actuator? Thanks for the great info.
-
- -Mark Anderson
(28.09.2006, 15:19)
techautosteve: Your welcome. You usually get it from the junk yard from a 92 or 93 Accord. But www.hondapartsnow.com/
or www.bernardiparts.com/
is a good place to start.
(29.09.2006, 08:50)
Mike Morris: I'd like to remove the driver's door panel on my 1991 Honda Accord LX; (broken latch. The door is locked shut.How do you get to the two
- retainer clips that are hidden between the door and the end of the dashboard? These two retainers are what's keeping me from getting inside the door. Any suggestions? Thanks, Mike
(09.01.2007, 18:32)
techautosteve: Normally, you'd take out the driver seat. This way you don't have to remove the retainer. You actually bend the door panel so you can get the drill in there. This usually damages the door panel.
-
- If you want to drill from inside the cabin like in figure 5, you'll have to be really accurate. And with a little mirror and a larger hole, you'll have to put the puzzels together and determine where you've drilled. Then drill a second hole in the right spot. I'd assume this will be difficult to do in any repect but I'd prefer the figure 5 method since it does less damage.
(13.01.2007, 09:38)
The fix is to replace the defective door latch with a new one. The problem is getting the defective one off the car. Honda never issued a TSB information on this problem or probably did recently, but many techs in the field perfected a way to drill into the latch and release it, allowing the door to open. Follow those procedure.