|
|
|||||||||||||||||||||||||||||||||||||||||||||||||||||||||||||||||||||||||||||||||||||
|
|
||||||||||||||||||||||||||||||||||||||||||||||||||||||||||||||
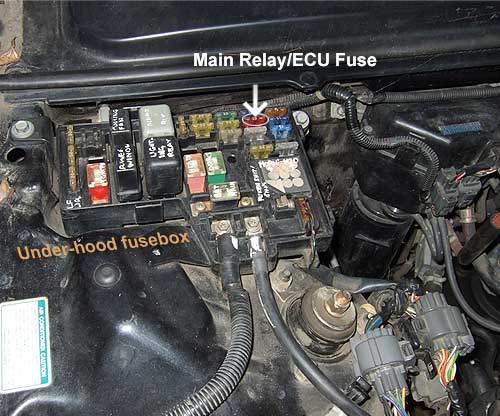
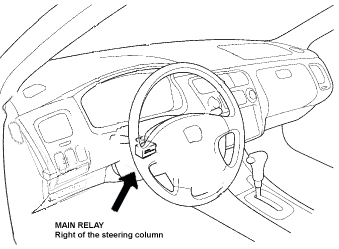
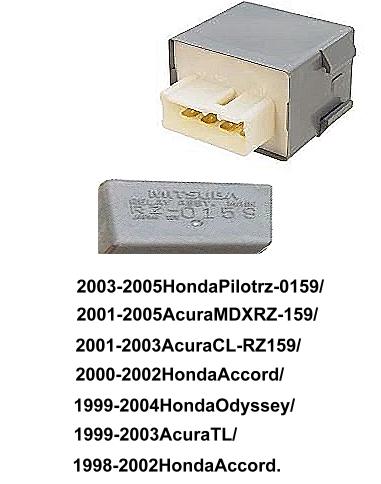
90, 91, 92, 93 Honda Accord location. The 94 Accord is to the right of the steering column. For others see links above and to your left.
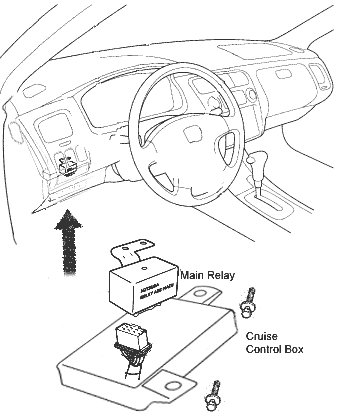
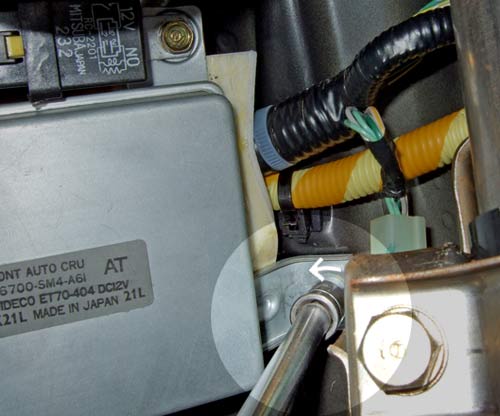
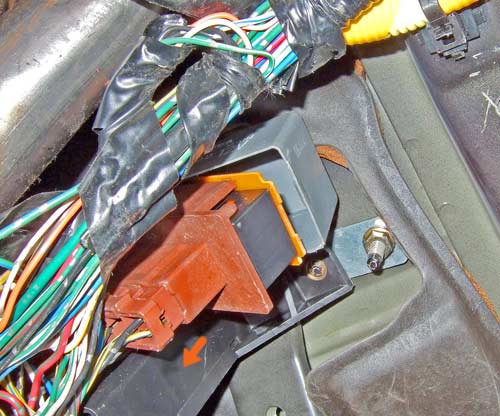
The main relay is located behind the dash on the driver side to the left of the steering column. It's hidden above the silver cruise control box. After removing the cruise control box, you will see the brown bottom of the main relay, which is a gray-orange cube with seven wires on the connector. (edited 3-18-07)
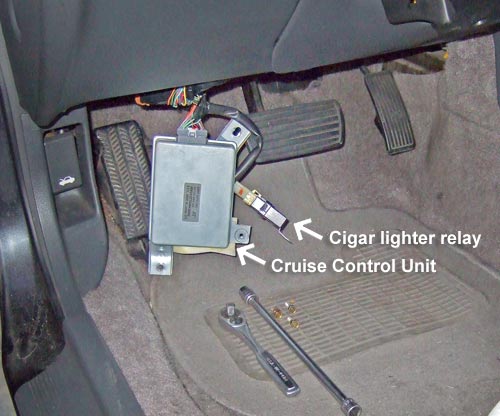
Step 1. Locate the cruise control box.
") Cruise control unit
Cruise control unit

You may remove the steering column access panel if the panel is in
your way. In this case, it was not necessary. Move your chair all the way back,
then lie on your back with a flashlight. Stick your head under the steering
column, right where the brake/gas pedal are. Using a ratchet with a 10 mm socket on a long extension, snug the 10-mm socket onto the cruise control unit
bolt, as shown in step 2 below and the image above.
Step 2. Remove the 3 bolts and the cruise control box.
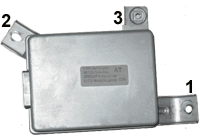 Remove
in this sequence.
Remove
in this sequence.
Twist the bolt counterclockwise and remove it. Continue to remove the rest
of the bolts. By removing the cruise control
box,
you will be able to see the bottom of the main relay.

Next, lower the cruise control box out of the way.
Step 3. Remove the main relay nuts and the main relay.
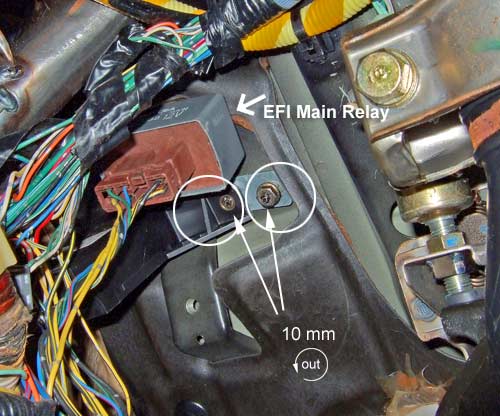

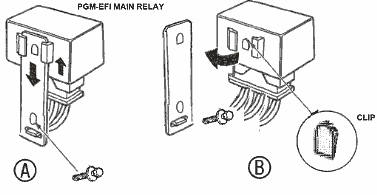
Count the number of (wire) terminal on the main relay. If it has seven terminals then remove the relay as an assembly.


To remove the relay, twist the 10 mm nuts on the main relay
counterclockwise. Then
remove the nuts and the relay (including the relay's steel flange) away from the fan timer unit
(the black box) by bending the timer unit (just enough) to slide the relay out.

Bend the right flange of the fan timer unit.
Then swing the relay out.
Images and step by step:
- First disconnect the car battery negative terminal with a 10mm wrench.
Disconnecting the battery isn't required if you are careful in step 3 or
you had removed the fuse to the relay mentioned in step 4. Next Pry the case. This is done with your thumb. Press your thumb on the
right edge of the casing while pulling the gut out. For those who are generally weak,
use a long flathead screwdriver. Stick the screw driver in between the gap
and twist while you yank down on the the wires. Grab all the wires at
once. Don't pull too hard or the wire could break. Do the same on
the other side. Click the image for a larger picture.

- Next, you will need one final push on the left edge. At the same
time grab on the wires and pull down on them. Separating the case from the gut
as you wiggle its way out.

- Next pull it straight down making sure the relay doesn't touch any metal
part of the car. Grab and cover the circuit board with your hand to
protect it from shorting out while you pull it down. See step 4 if you
touch the relay solder side to the metal grounded part of the car (while
the car battery isn't disconnected) and it still won't start.
- If there was a spark on the solder side of the main relay as it came on
contact with a piece of metal during your removal on step 3, your car may
not start, as had happen to one reader who suggest more emphasized on this
section. The piece of metal could be your wedding ring, screwdriver, metal
tabs that are sticking out from the car or simply a penny. Or now your check engine light is
steady on as you try to start and it wasn't there
before, then this is the fuse you might want to look for. Replace this fuse if it is blown.
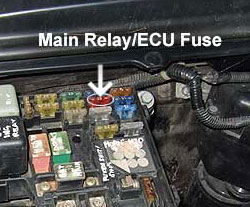
CAUTION: The main relay is live so you should disconnect the car battery or fuses since you may accidentally short the relay or other nearby parts. The symptom of a short is when your check engine light is steady on and your car won't start.
- The final step is to go to the actual step 5 of this page to begin the repair process. Or swap it out with your brand new relay.

Cons: There are a few drawbacks for this method.
1) The main relay
installs right back into the deep hot zone, unless you bolt the new relay
elsewhere. It's then covered by the cruise
control box and kept out of sight, increasing difficulties in the future.
2) Then
there is a potential for a short during removal, unless precautions are
taken.
3) The radio memory may reset if the car battery is disconnected. On some antitheft stereos, you must also have the stereo activation codes
ready.
This type of gut removal is unconventional, but it's worth mentioning because of its popularity on the web and sometimes will work best on difficult vehicles.
Shortcut removal method 2: Using a large flathead screwdriver:
Steps:
- Stick a large flathead screwdriver in between the metal tab (the tab seen on A.)
- Twist the screwdriver in order to pop the relay's plastic case away from the metal tab (B.)
- Bring the relay down and swap the relay with a new one. See 'Release the connector' if you need help disconnecting it.
- Zip tie the new one to a new location making sure it can breath and not vibrate too much.
Shortcut removal method 3: Using a thumb and a new relay. (best choice if you have a new relay)
- Press the locking tab on the electrical connector and hold.
- Pull the electrical connector to release it from the main relay.
- Bring the the electrical connector down to plug into your new relay.
- Zip tie the new relay to a new location making sure it can breath and not vibrate too much.

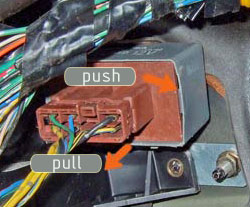
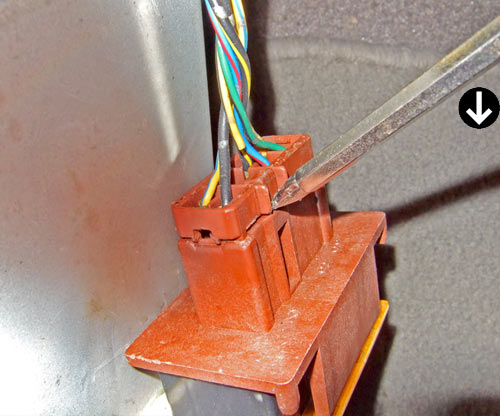
Step 4. Release the connector.

Bring the relay into a comfortable position.
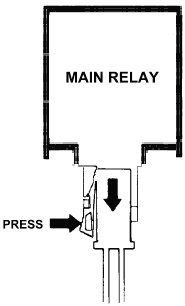 Squeeze in the connector's locking tab and unplug the connector from the relay.
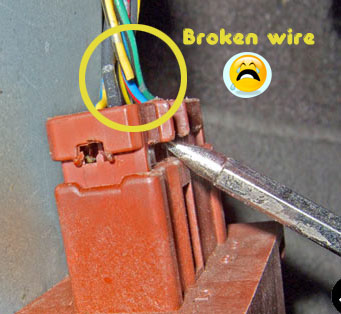
(You'll be tempted, but do not pull on the wires. This is what happens if you do.)
Squeeze in the connector's locking tab and unplug the connector from the relay.
(You'll be tempted, but do not pull on the wires. This is what happens if you do.)
Or you can use a small flat-head screw driver as shown below. Simply push then hold the screwdriver into the clip-lock then swing your screwdriver downward.

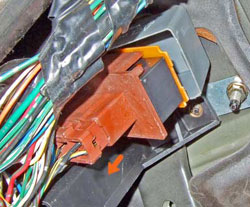
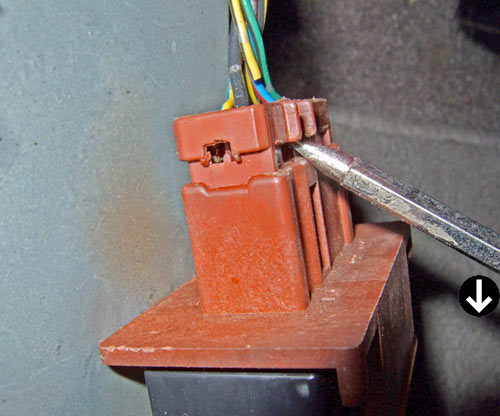
Step 5. Inspect the solder joints.
Skip to step 6 if you are replacing the main relay.
See this image ![]() to open the case.
to open the case.
 *
*
A bad joint is characterized by a crack effect on the solder. A good
place to "resolder" the main relay is at mainrelay.html.
 enlarge
Step 6. Install the new main relay.
Connect the connector to the main relay and make sure it's locked in firmly. Put the relay back into it's original bolt and location but this time face the relay the opposite direction, I'll explain the reason why below. Screw in the nut by hand and tighten it with the 10mm socket wrench.
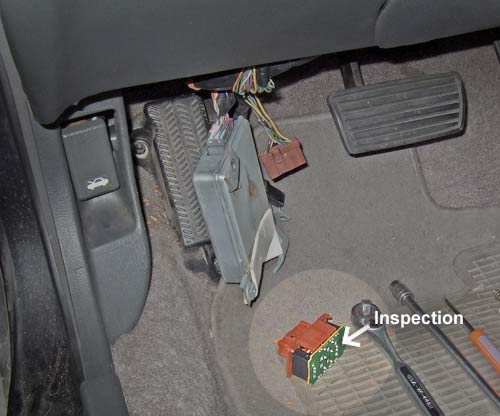
 Areas where the main relay should be.
If you choose to install
the main relay onto its original location make sure the cruise control
box isn't
blocking the view of the main relay. Install the main relay facing in the opposite
direction (like the image below) of it's original position (which is the image in
step 3.) Then install the cruise control box. This ensures that you
may be able to easily spot and remove the main relay with just your fingers in the future. It isn't required
to bolt the main relay back at its original spot. You may may move the relay to a low, suitable spot
where it is cool and away from heat vents. Make sure air can circulate around the relay on all four sides.
Above: Install
facing this way.

To ensure that the relay fits perfectly into the same location (but not the same position) a larger hole may be drilled (image on right) on the flange. otherwise,
drilling isn't required and a single nut will hold the relay in place.
Install
in this sequence: 1-3-2, all loosely then tighten once all are in. This part was corrected by a reader.
Install the cruise control box by screwing on the bolts by hand, using your socket and extension in the sequence above. Install the bolts loosely. Once all the bolts are in their slots, attach the ratchet to the extension and twist the bolts to about 8 or 9lb-ft.

New position.
Step 7. Test run the main relay.
Finally,
start the car and make sure the car can restart after the engine idles for a
few minutes with the windows closed, the heater on down draft and on maximum. Make sure the
main relay doesn't rattle against something, push up against something (because the main relay needs breathe room) or wiggle during an engine idle.
Your work is complete. More installation detail is found at
the bottom of this page.
94 Honda Accord relay location:

Steps:
- Remove the access panel below the lower the steering column.
- Look for the main relay (deep in there) by counting the number of terminal (wires) on the main relay. If it has seven terminals then remove the relay assembly or slide or pry the relay off from its flange as in picture A.)
86, 87, 88 and 89 Honda Accord and some Acura Integra relay location removal procedure:
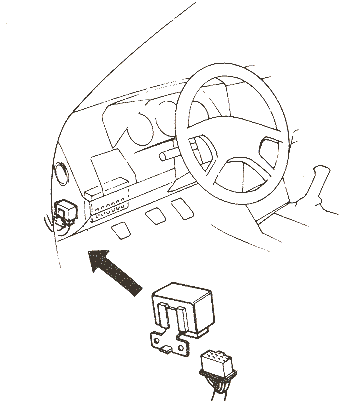
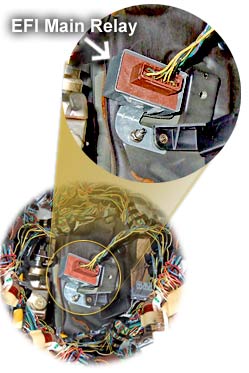
The main relay is located just right above the hood release, inside the dash panel bolted to the left kick panel with a bolt that will fit a 10 mm socket. It has seven wires from the connector. Older Acura Legends is located behind the fuse panel near the firewall.
- Remove the coin box (for a better view.)
- With a 10 mm socket or wrench., reach deep inside and at the top of the relay there you will feel a bolt.
- Unbolt it. (If you cannot unbolt then you may dislodge the relay from the the steel flange using a large flat head screw driver or pull the relay guts out of its casing. See drawing D below.)
- If you damage the flange, you may be able to flatten the flange back to shape.
- Bring the relay down and unplug the connector by squeezing the locking tab then separate the connector from the relay.
- See installation at the bottom of this page.
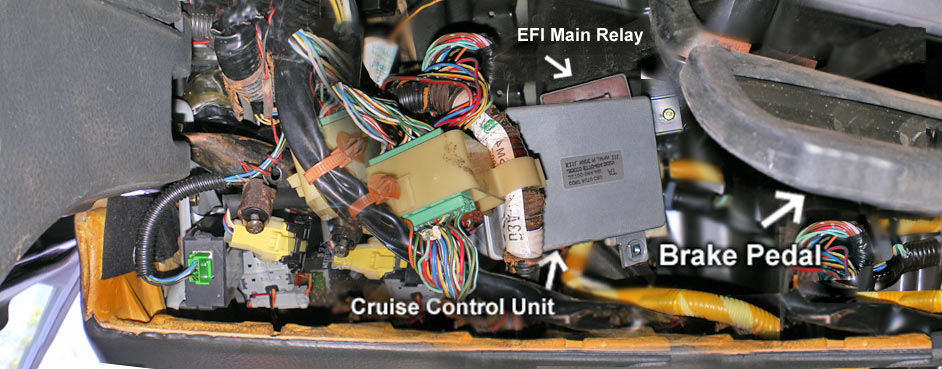
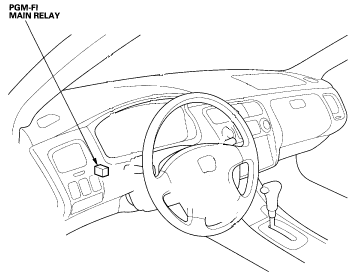
Location for the 98, 99, 00, 01 Honda Accord
What are some tricks get the main relay out?
There are four ways to get it out. First you have to reach high up in there and do all this with one hand and a flashlight.
 Steps:
I. Unbolt the bolt using a 10mm socket (picture A) or
II. Unclip the clip from the steel flange and slide it apart (picture A) or
III. Separate the steel flange from the plastic case (picture B) with a
large flat screw driver
jam and twist between the plastic case and the flange or
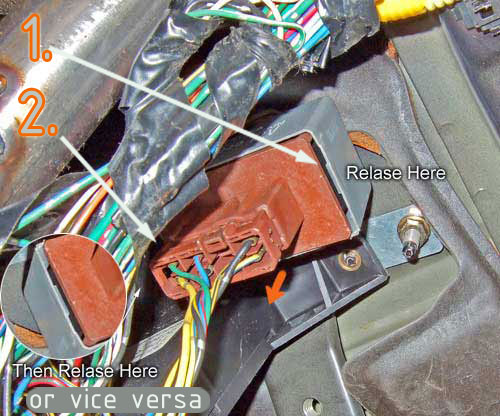
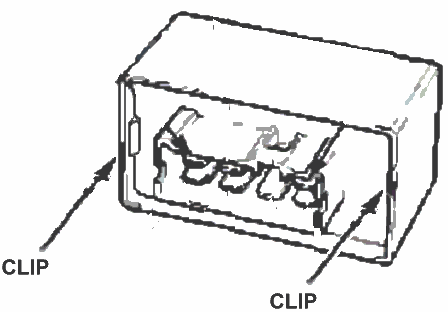
IV. Disconnect the negative battery terminal. Unclip two clips I pointed with two arrows (picture
C, or below)
with a small flat head screw driver or with a strong thumb and then yank it out
(D.)
This is the preferred choice by many. Mechanics prefer choice I but many
would prefer choice III or IV if the relay is in a difficult position,
such as in the 94 and 88 Accords. Click
to enlarge.
I can't find my main relay, where is it at?
INSTALLATION DETAILS
-
Installation is the reverse of the procedure.
-
It isn't required to install onto its original location. Move it to a cooler practical location. Eg., away form heat ducts, vibrations or from higher locations. You may zip tie it onto the ends of a large wire harness. The large harness transfer less vibrations. And future troubleshooting would be far easier, considering that the location you've chosen is practical or similar to the location on the images above. Doing this ensures that future technicians will be able to find it.